Help Center
Questions?
We have the answers.
HELP CENTER: GETTING STARTED
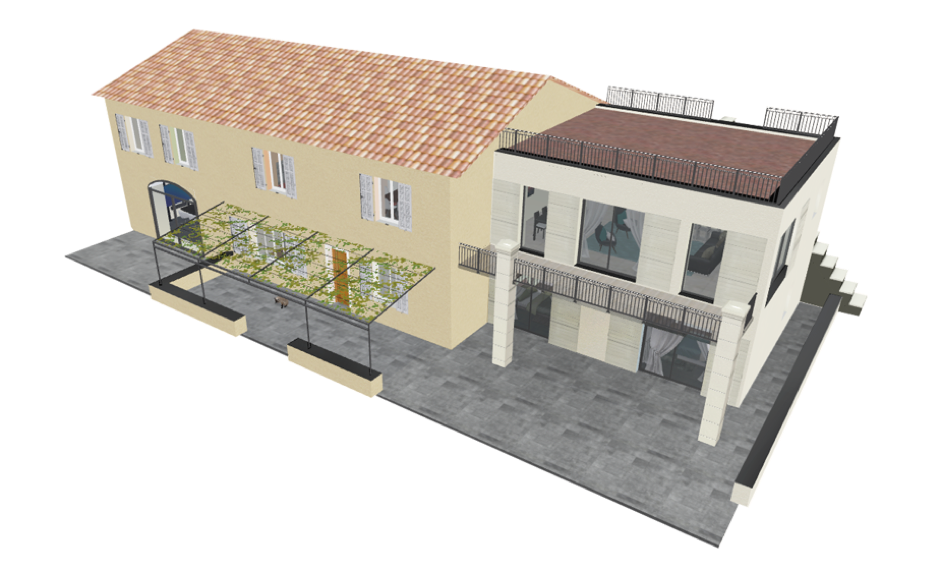
The new version of 3D Event Designer is here! Have a question on a feature? View our Help Center topics below for step-by-step instructions to learn how to easily use our floor plan software.
3D EVENT DESIGNER INTERFACE:
-
2D View
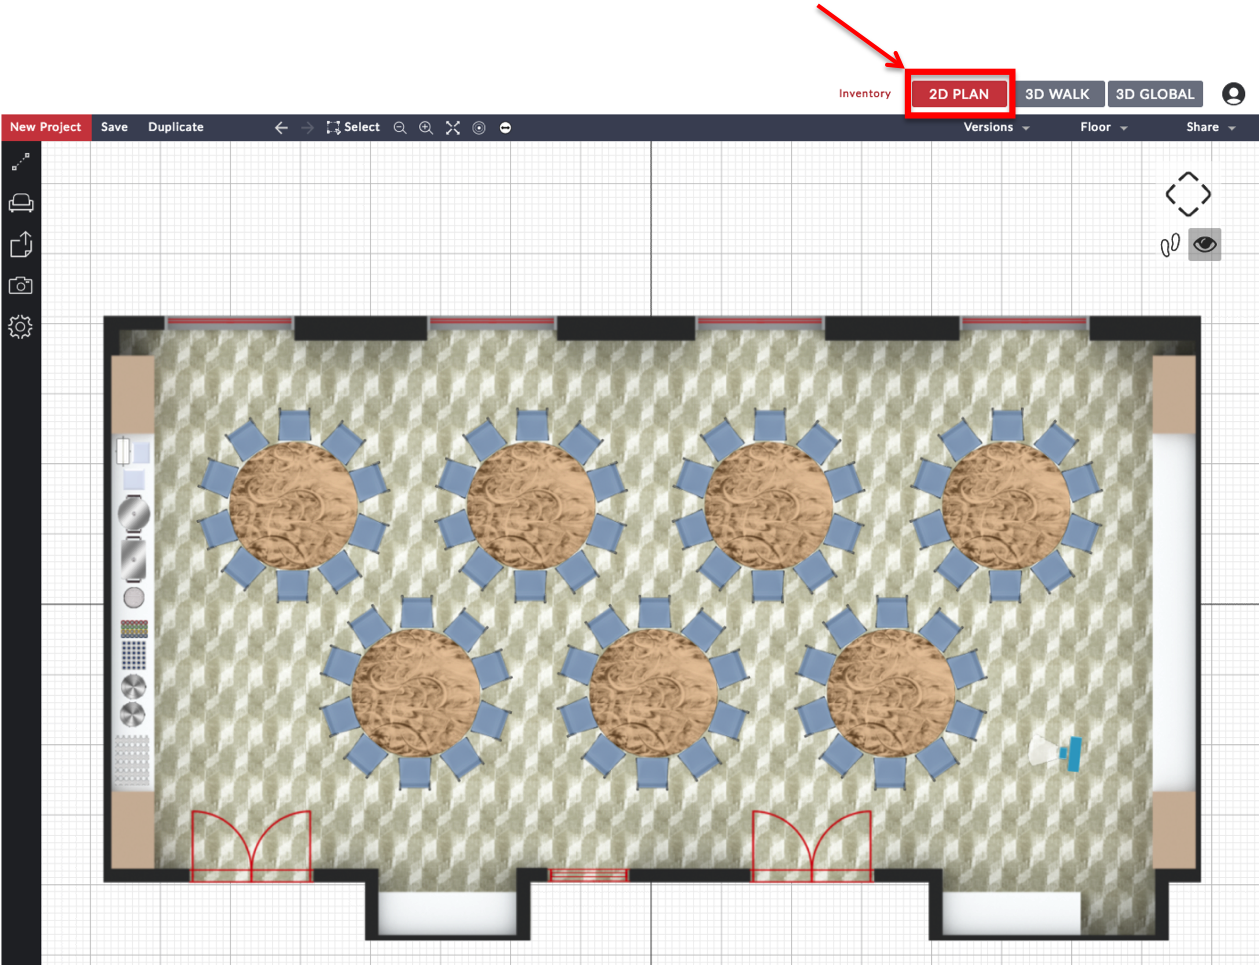
- To be in the 2D point of view, click on the “2D Plan” button located in the upper right corner of the screen
- The 2D view is where you can add new furniture and décor items, as well as, make edits to existing items already in the floor plan
-
Point of View

- The blue camera icon seen on the floor plan in the 2D view is the starting viewpoint in the "3D Walk" view
- Easily click on the camera to move its location
-
Change the First Person Camera View Height
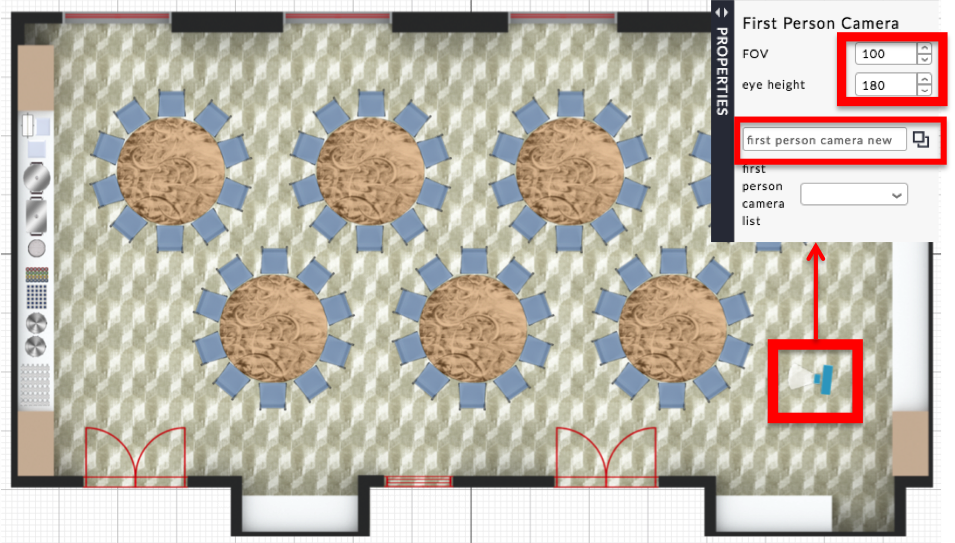
- Click on the blue camera icon and the Camera Properties window will appear on the right
- Edit the "Eye Height" dimension to change how high the camera viewpoint will be in the 3D View
- Enter the name of the person in the "First Person Camera List" field
-
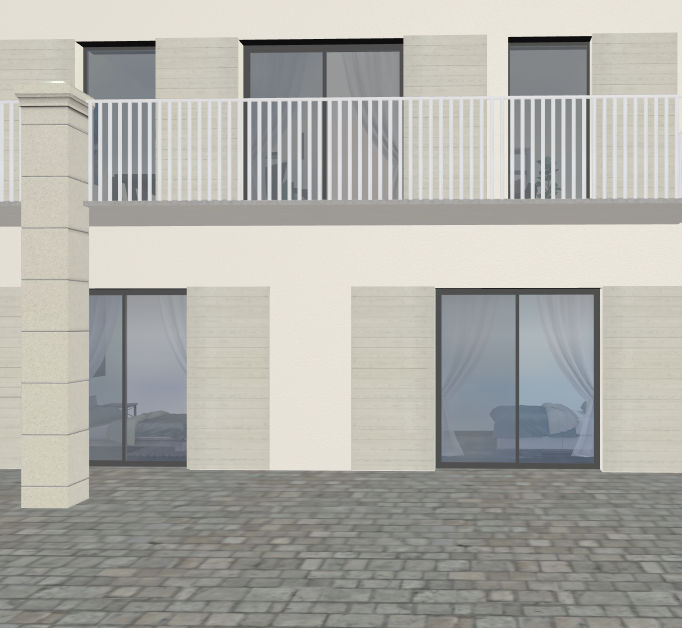
3D Walk
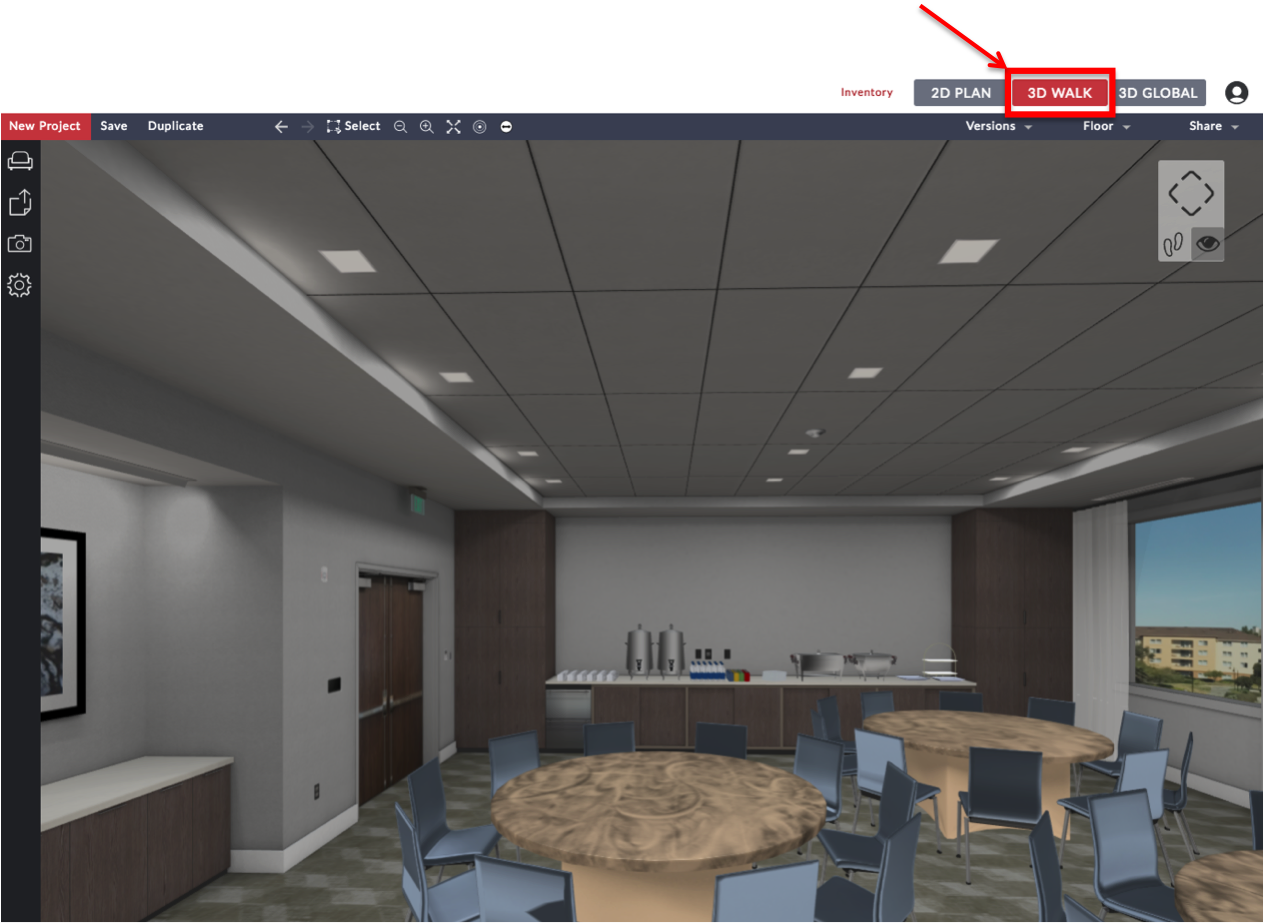
- To be in the 3D eye level point of view, click on the “3D WALK” button located in the upper right corner of the screen
- The 3D view is where you can walk through the floor plan from eye level
-
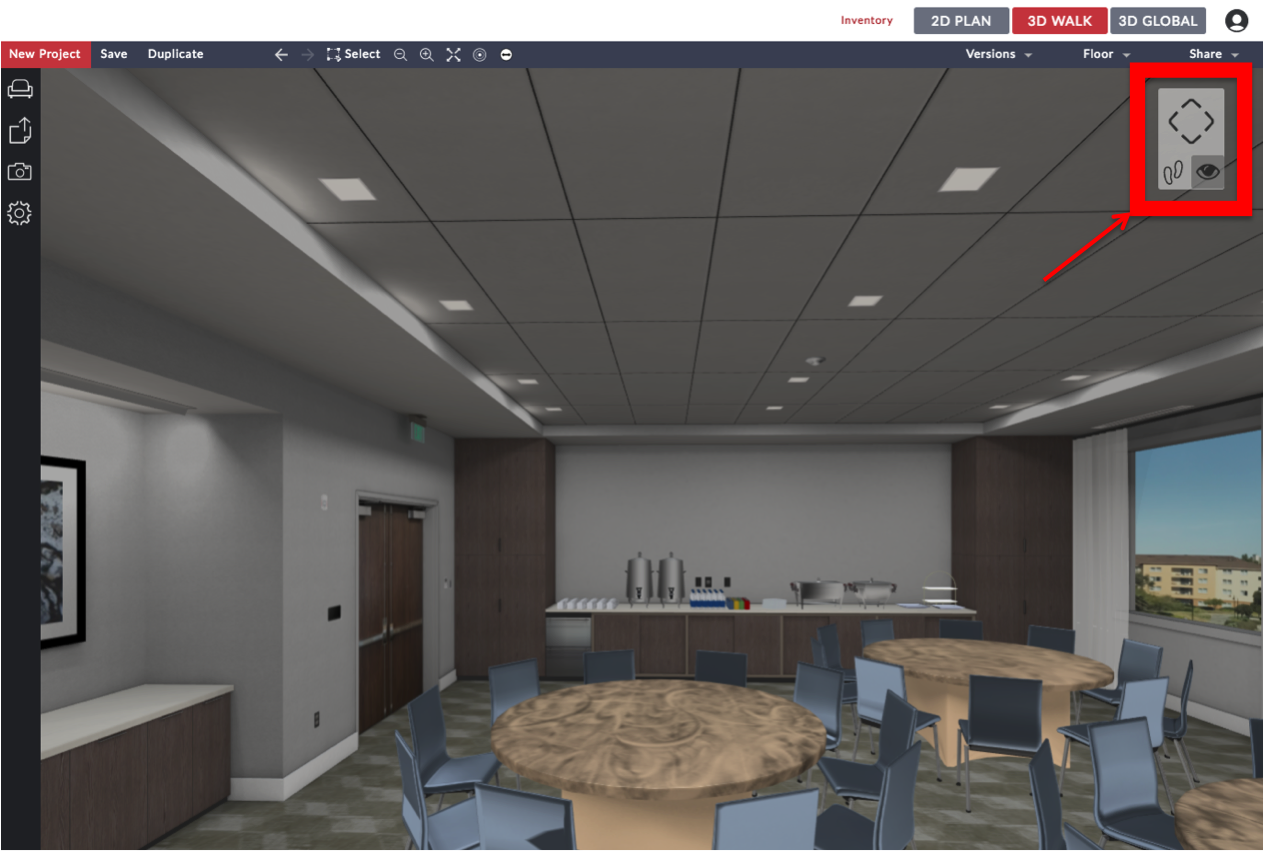
3D Walk Navigation
-
Computer Mouse
- Move Forward: Click on the screen and drag the computer mouse down
- Move Backward: Click on the screen and drag the computer mouse up
- Rotate Left: Click on the screen and drag the computer to the right
- Rotate Right: Click on the screen and drag the computer to the left
-
Keyboard
- Move Forward: Press and hold the keyboard up arrow
- Move Backward: Press and hold the keyboard down arrow
- Rotate Left: Press and hold the keyboard left arrow
- Rotate Right: Press and hold the keyboard right arrow
-
Software Navigation
- Move Forward: Press and hold the up arrow
- Move Backward: Press and hold the down arrow
- Rotate Left: Press and hold the left arrow
- Rotate Right: Press and hold the right arrow
-
Computer Mouse
-
3D Global
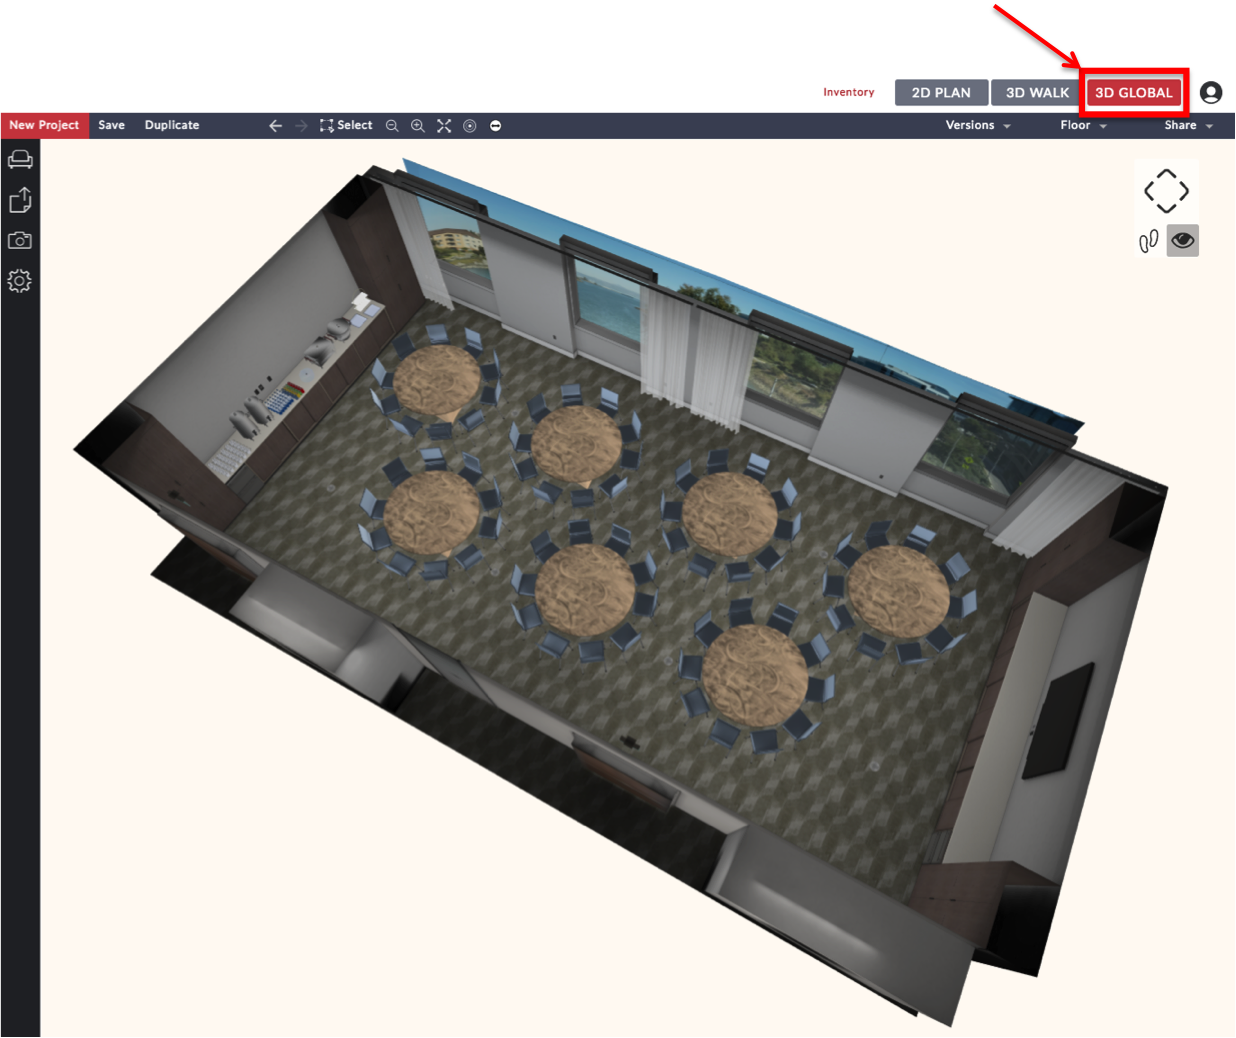
- To be in the 3D aerial point of view, click on the “3D Global” button located in the upper right corner of the screen
- The 3D Global view is where you can see an aerial view of your floor plan, where you can view multiple Floors / Levels together at the same time, and can click on a furniture or décor item to make edits (such as change the dimensions or the color of an item)
-
3D Global Navigation
-
Computer Mouse
- Rotate Up: Click on the screen and drag the computer mouse down
- Rotate Down: Click on the screen and drag the computer mouse up
- Rotate Left: Click on the screen and drag the computer to the right
- Rotate Right: Click on the screen and drag the computer to the left
-
Keyboard
- Move Forward: Press and hold the keyboard up arrow
- Move Backward: Press and hold the keyboard down arrow
- Move Left: Press and hold the keyboard left arrow
- Move Right: Press and hold the keyboard right arrow
-
Software Navigation:
- Zoom In: Press and hold the up arrow
- Move Backward: Press and hold the down arrow
- Rotate Counterclockwise: Press and hold the left arrow
- Rotate Clockwise: Press and hold the right arrow
-
Computer Mouse
CREATE A ROOM:
-
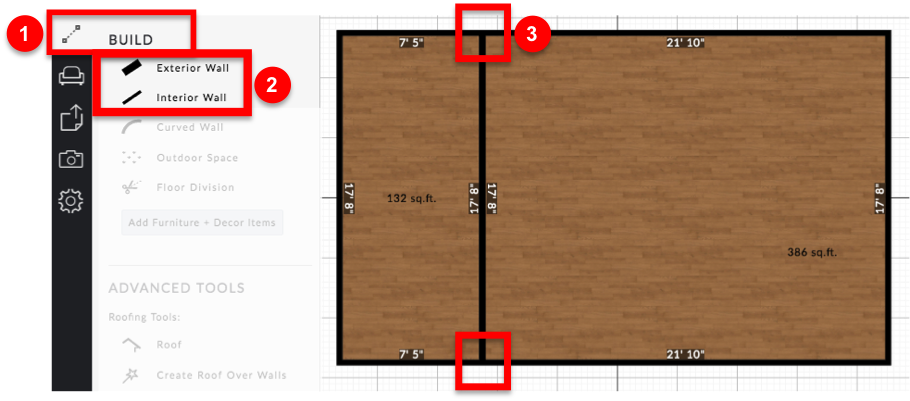
Draw a Room
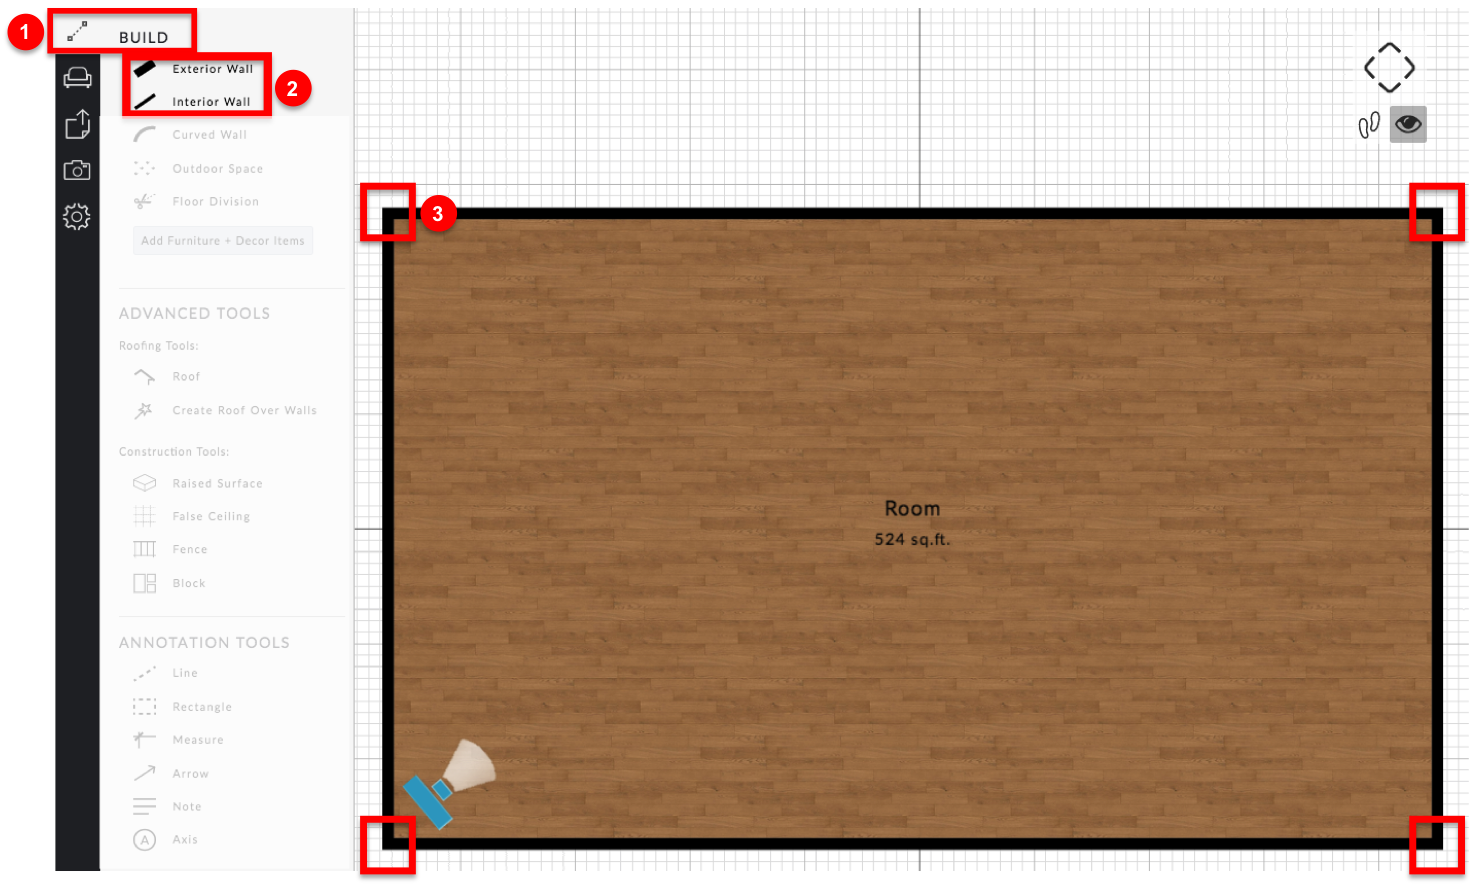
- Click on the
 "BUILD" tab
 - Click on the "Exterior Wall" or "Interior Wall" drawing tool
- Left click your mouse (on a tablet tap your finger) where each corner of the room will be
- The room will snap together once you click all corners of the room and end by clicking on the starting point
* To exit out of the wall drawing mode: Press the "Escape" key on your keyboard or double click your mouse (on a tablet double tap your finger)
** Tip: Draw a wall through where a door or window will be placed (you do not need a cut out for a door or window as doors and windows snap into walls)
- Click on the
-
Draw Partitions or Walls
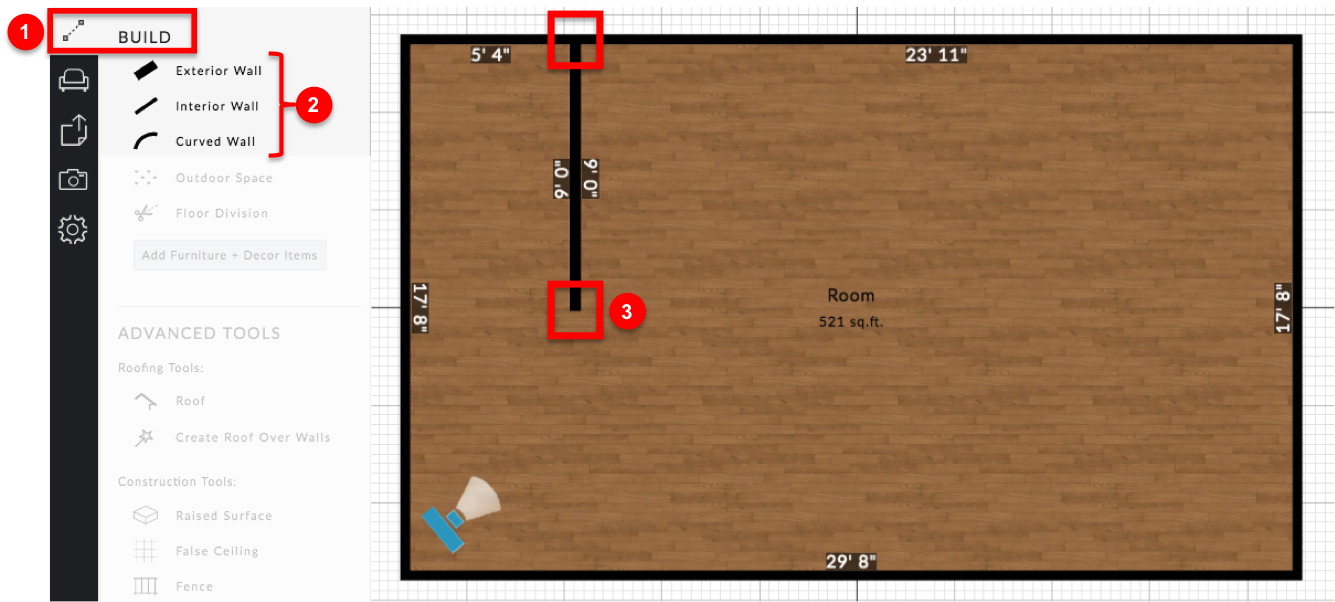
- Click on the "BUILD" tab
- Click on one of the Wall tools (for example: "Exterior Wall", "Interior Wall", or "Curved Wall"
- Left click your mouse (on a tablet tap your finger) two (2) times: 1) At the start of the wall / partition and 2) Again at the end of the wall / partition
- Double click or press the "Escape" key on your keyboard to exit out of drawing mode (on a tablet double tap your finger)
- To make a wall a half height wall, click on the wall in the floor plan
- The Wall’s Properties window will appear on the right
- In the "Height" field enter the desired height dimensions
- Click on the
-
Add Columns
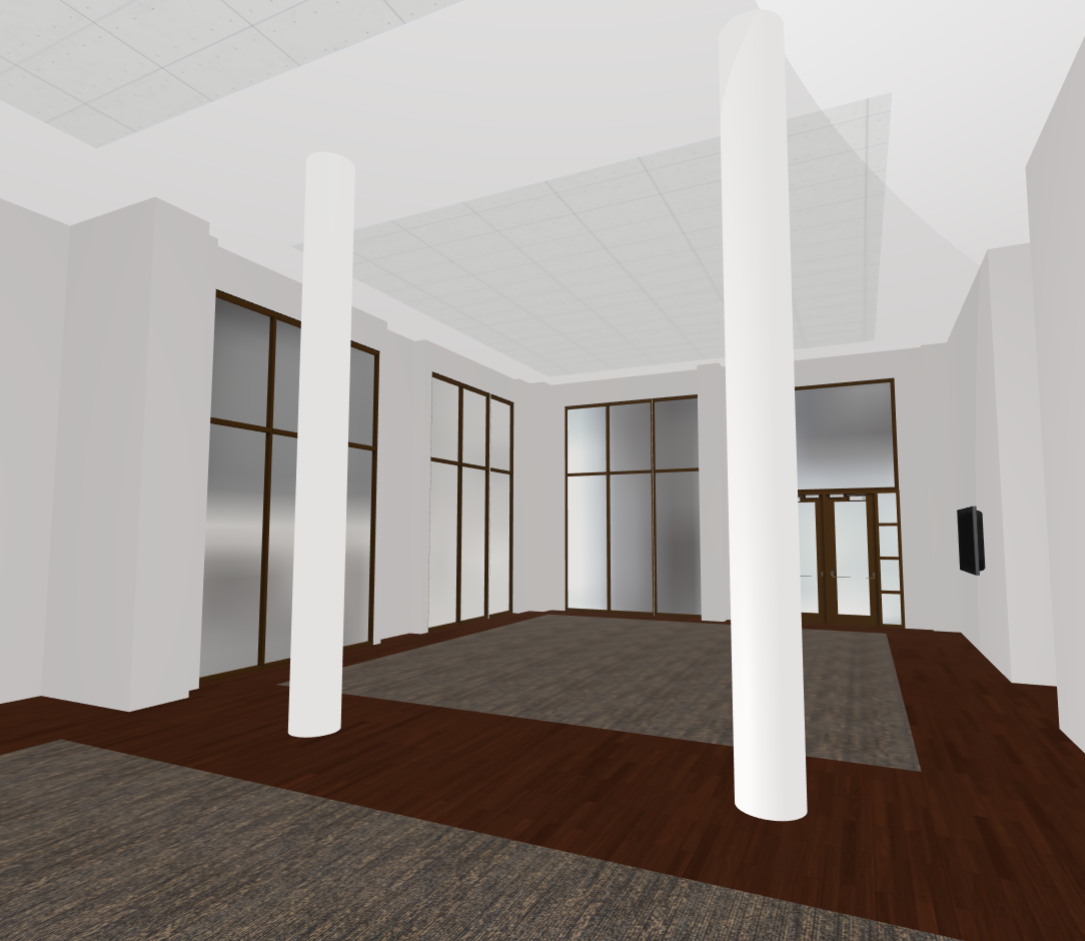
There are two (2) ways to add columns to a floor plan: 1) As a wall and 2) As an Item
As a wall:
- While in the "2D Plan" view, click on the "BUILD" tab
- Click on the "Interior Wall" drawing tool
- Left click your mouse (on a tablet tap your finger) two (2) times: 1) At the start of the column and 2) Again at the end of the column
- Double click or press the "Escape" key on your keyboard to exit out of drawing mode (on a tablet double tap your finger)
- Click on the new column in the floor plan and the Wall Properties window will appear on the right
- In the "Thickness", "Height", and "Depth" fields, change the dimensions to the desired column sizes
- Click on the "Materials" icons to change the color and texture of the column (for example: change the color from white to grey or the material from plaster to brick)
As an Item
- While in the "2D Plan" view, click on the
 "FURNISH" tab
 - Click on the "Room Construction" -> "Columns" category
- Click on the desired column and drag it into the floor plan
- While in the "2D Plan" view, click on the
-
Draw Curved Walls
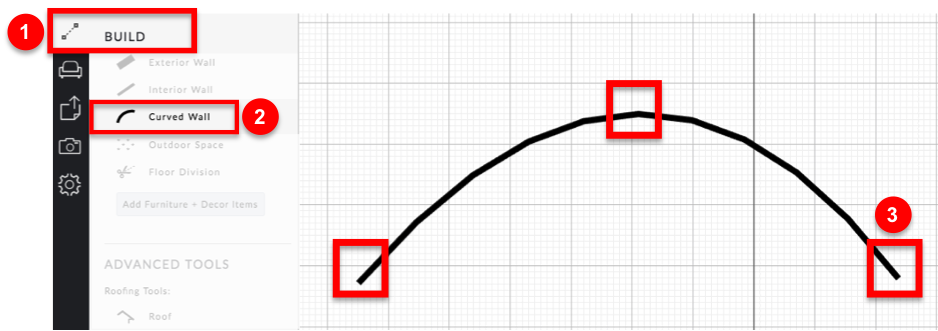
- While in the "2D Plan" view, click on the "BUILD" tab
- Click on the "Curved Wall" drawing tool
- Left click your mouse (on a tablet tap your finger) three (3) times: 1) At the start of the curved wall, 2) At the arch of the curved wall, and 3) At the end of the curved wall
- To change the curve, click on the wall and a circular wall handle will appear
- Click and hold on the circular wall handle and drag to the desired curvature
- While in the "2D Plan" view, click on the
-
Move Walls or Resize a Room

- While in the "2D Plan" view, click on a wall in the floor plan
- Drag the wall to resize the room
-
Move Room Corners
- While in the "2D Plan" view, click on a corner of a wall in the floor plan
- Drag the corner to change the angle or to resize the room
-
Merge Two (2) Room Corners
- While in the "2D Plan" view, click on a corner of a wall in the floor plan
- Drag the corner on top of another corner – these two corners will then be merged
-
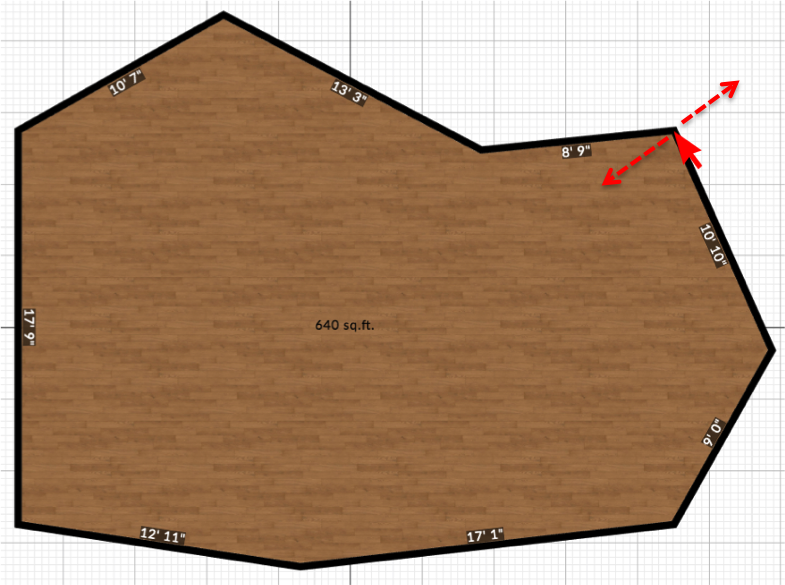
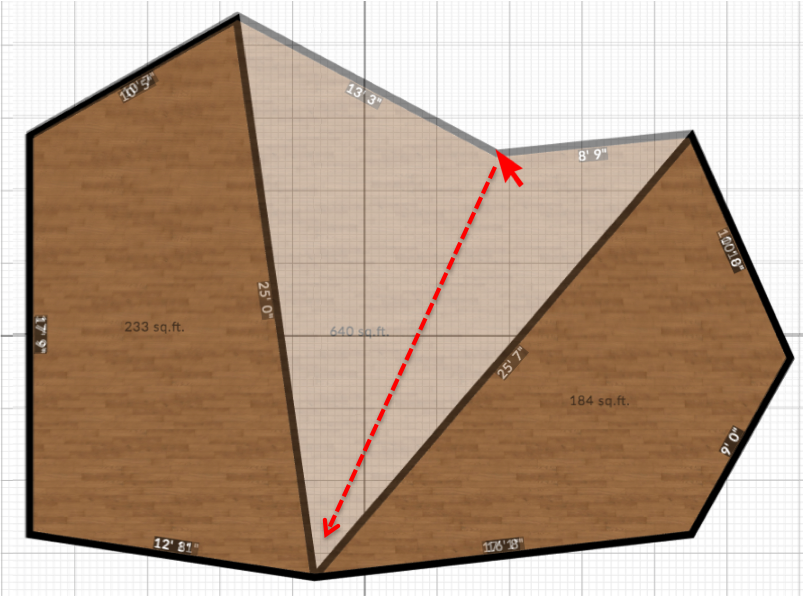
Divide a Room
- While in the "2D Plan" view, click on the "BUILD" tab
- Click on the "Exterior Wall" or the “Interior Wall” drawing tool
- Left click your mouse (on a tablet tap your finger) 2 times: 1) At the start of where you want to divide the space and 2) Again at the end of where you want to divide the space
- Double click or press the "Escape" key on your keyboard to exit out of drawing mode (on a tablet double tap your finger)
- While in the "2D Plan" view, click on the
-
Change the Wall Angle
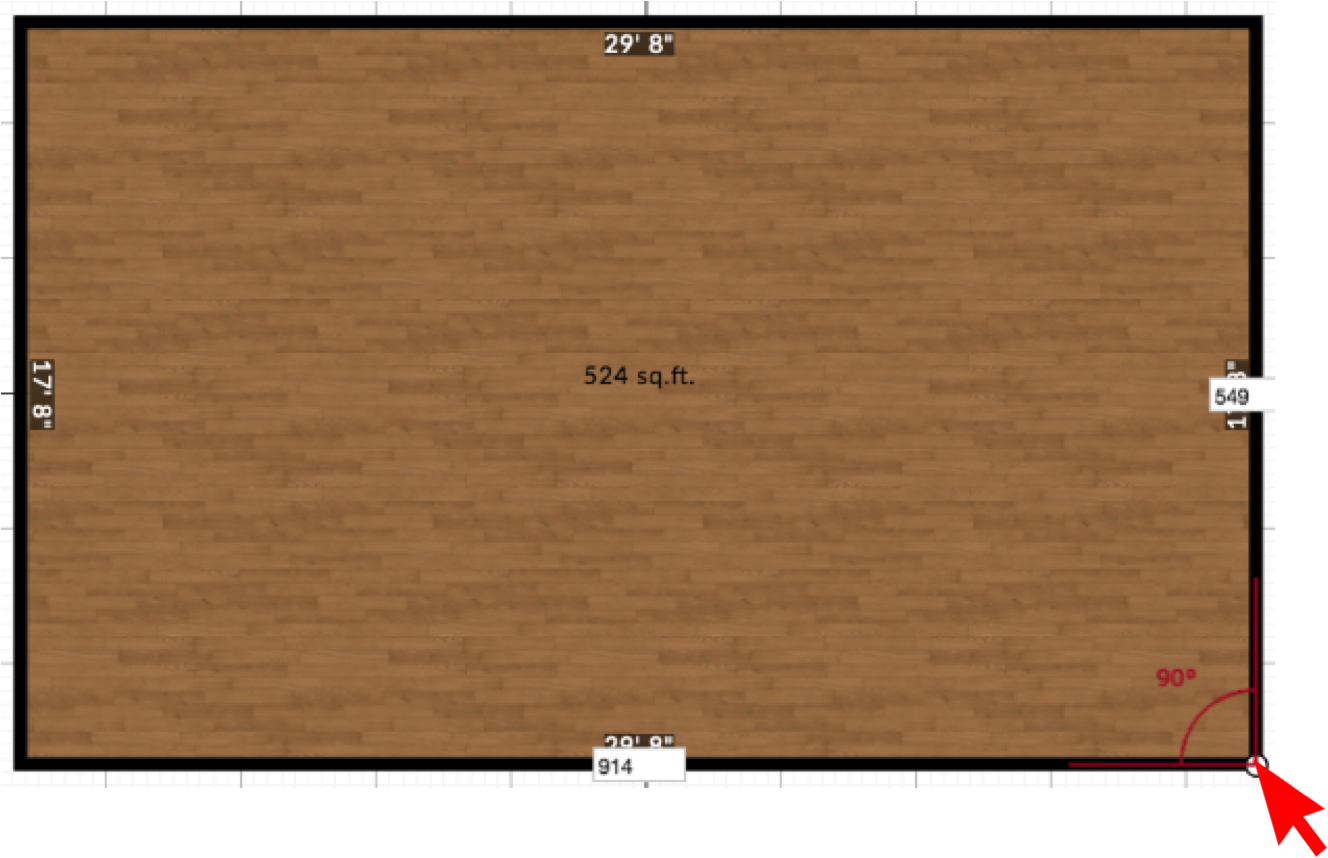
- While in the "2D Plan" view, click on a corner of the room to show the degree of each angle
- To change the degree of an angle, simply drag the corner to a new position
-
Import a Background Image (2D Floor Plan or Flooring)
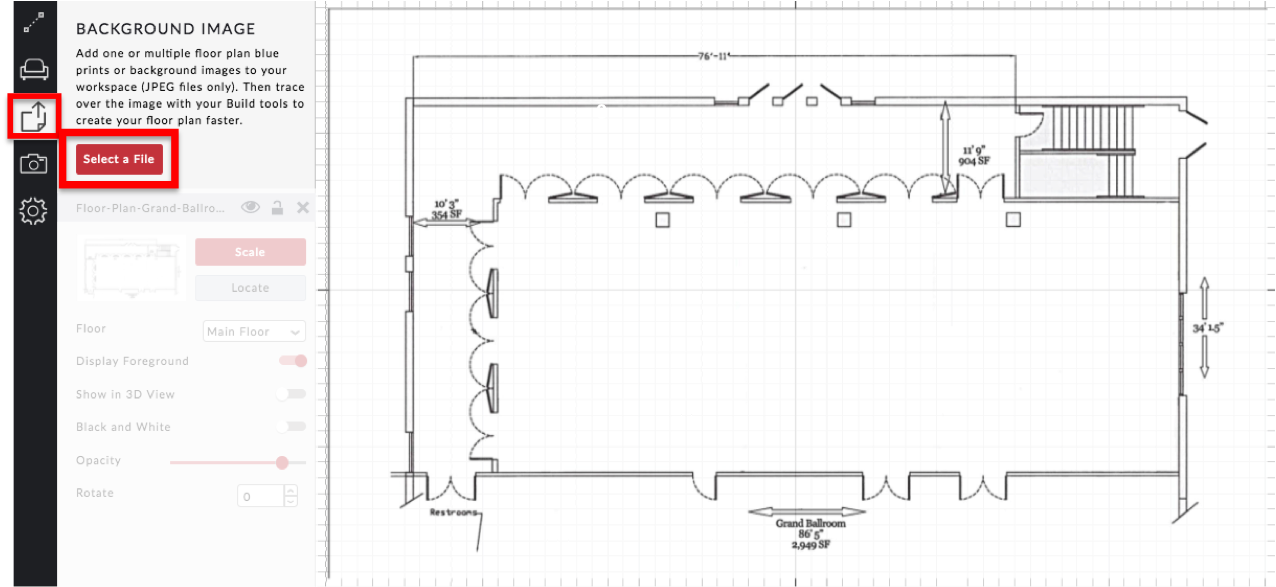
- While in the "2D Plan" view, click on the
 "BACKGROUND IMAGE" tab
 - Click the "Select a File" button
- Locate the image on your computer, select it, and click the "Upload" button
* Tip: This feature has two (2) purposes: 1) 2D Architectural Floor Plans – Upload a 2D architectural floor plan to easily trace over and create a 3D floor plan and 2) Flooring – Upload a flooring image or pattern to view in both 2D and 3D)
- While in the "2D Plan" view, click on the
-
Background Image Options
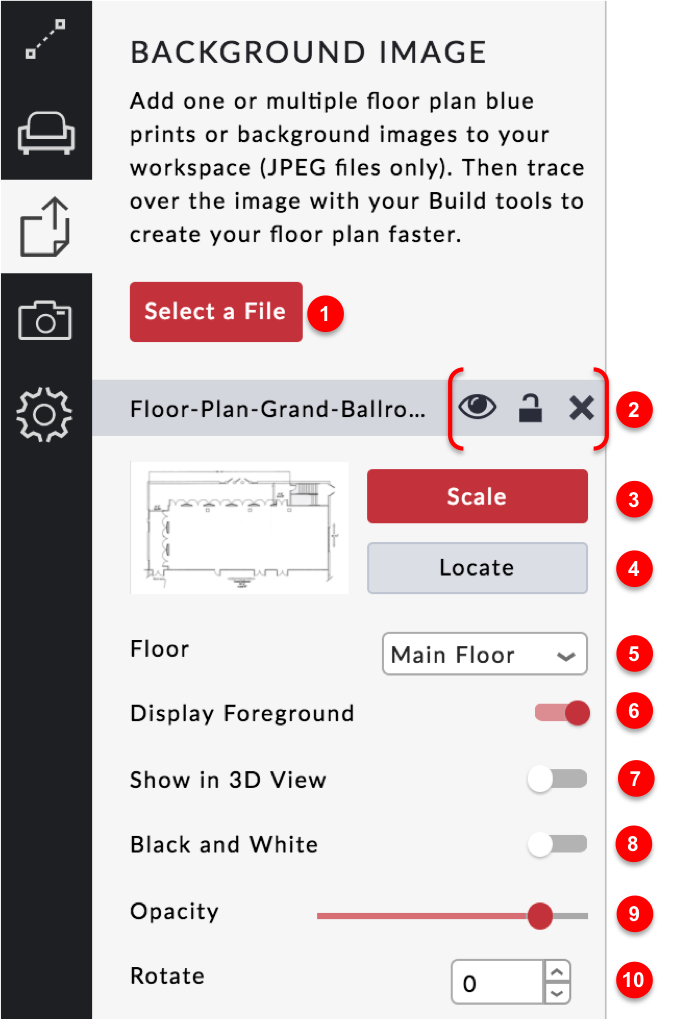
- Select a File: Find the floor plan image saved on your computer and upload it
- Hide / Lock / Delete:
 Hide the Background Image in the workspace;
 Lock the Background Image in place so it can not move in the workspace;
 Delete the Background Image from the software
- Scale: Scales the Background Image to the correct dimensions
- Locate: Centers the Background Image in the center of your workspace window
- Floor: Places the Background Image on the desired floor/level within the project
- Display in Foreground: Places the Background Image on top of drawn Rooms or Outdoor Spaces
- Appears in 3D View: Shows the Background Image on the floor in the 3D View
- Black and White: Converts a colored Background Image to black and white color
- Opacity: Changes the translucency of the image
- Rotate: Rotates the placement of the Background Image
-
Scale a Floor Plan Image & Trace Over It
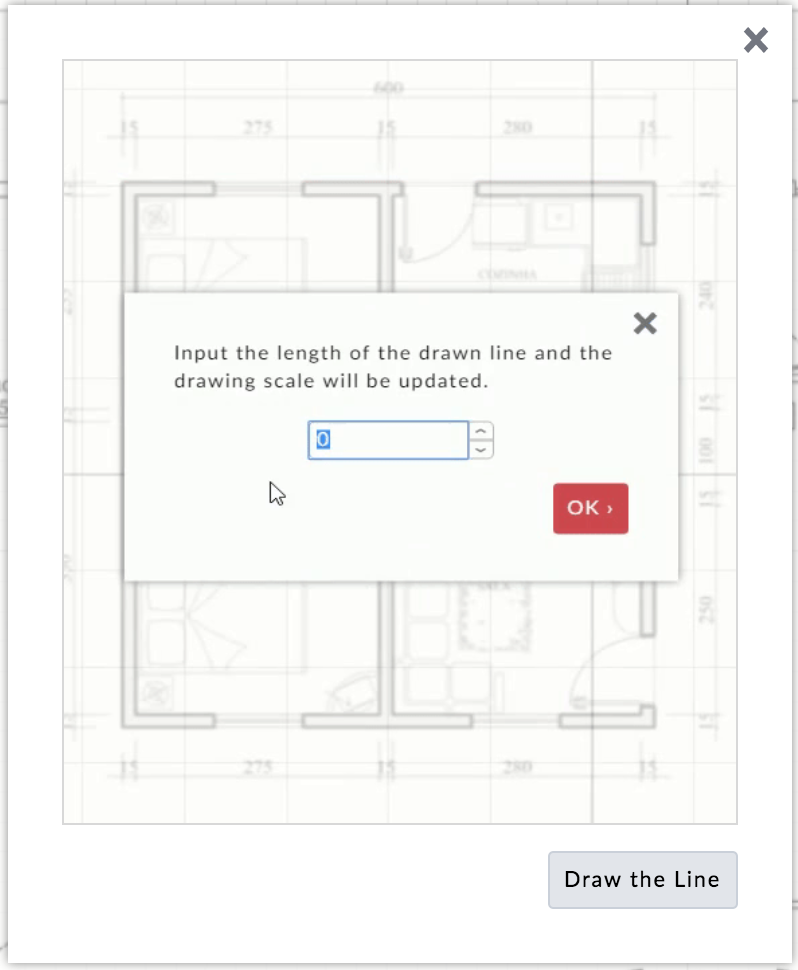
- While in the "2D Plan" view, click on the "BACKGROUND IMAGE" tab
- Click the "Browse" button
- Locate the image on your computer, select it, and click the "Upload" button
- Click on the
 "Lock" icon to lock the image in place
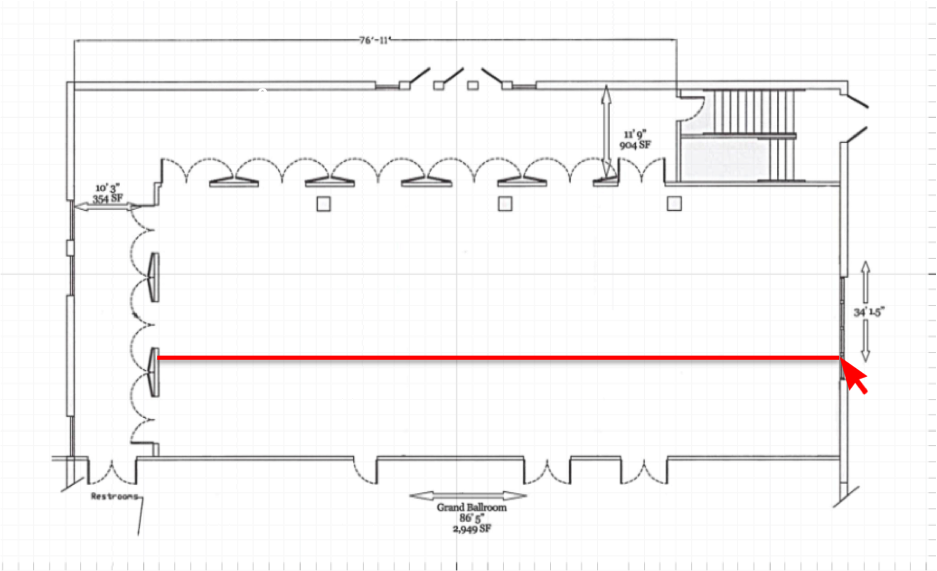
 - Click the "Scale" button to begin scaling the image and then click the "Draw the Line" button
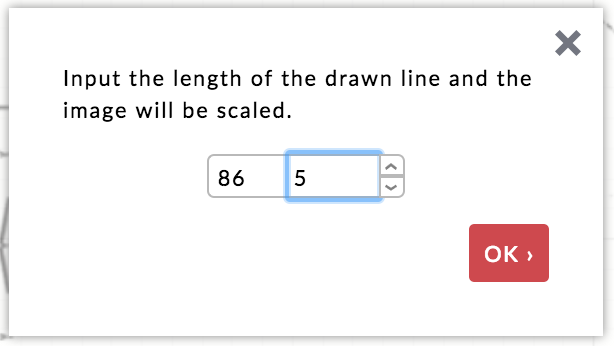
- Draw a line the length of one of the walls by left click your mouse (on a tablet tap your finger) two (2) times: 1) At the start of the wall and 2) Again at the end of the wall
- lnsert the actual wall dimension
- Click on the "BUILD" tab
- Click on the "Exterior Wall" drawing tool to begin drawing the walls by tracing over the image
- Left click your mouse (on a tablet tap your finger) where each corner of the room will be
- The room will snap together once you click all corners of the room and end by clicking on the starting point
* To exit out of the wall drawing mode: Press the "Escape" key on your keyboard or double click your mouse (on a tablet double tap your finger)
** Tip: Draw a wall through where a door or window will be placed (you do not need a cut out for a door or window as doors and windows snap into walls)
- While in the "2D Plan" view, click on the
-
Display the Floor Plan Image in the Foreground
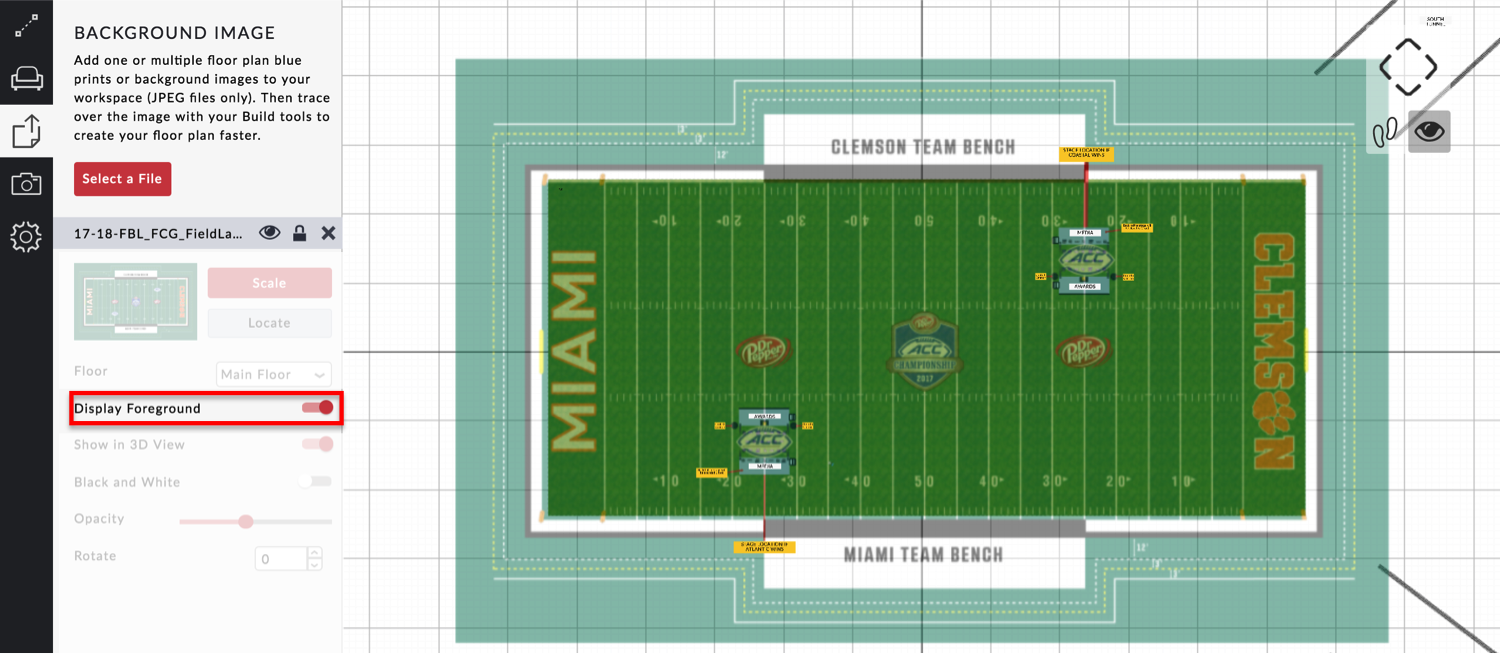
- Click on the "BACKGROUND IMAGE" tab
- Slide the “Display Foreground” button to the right
- Click on the
-
Show the Background Image (2D Floor Plan or Flooring) in 3D
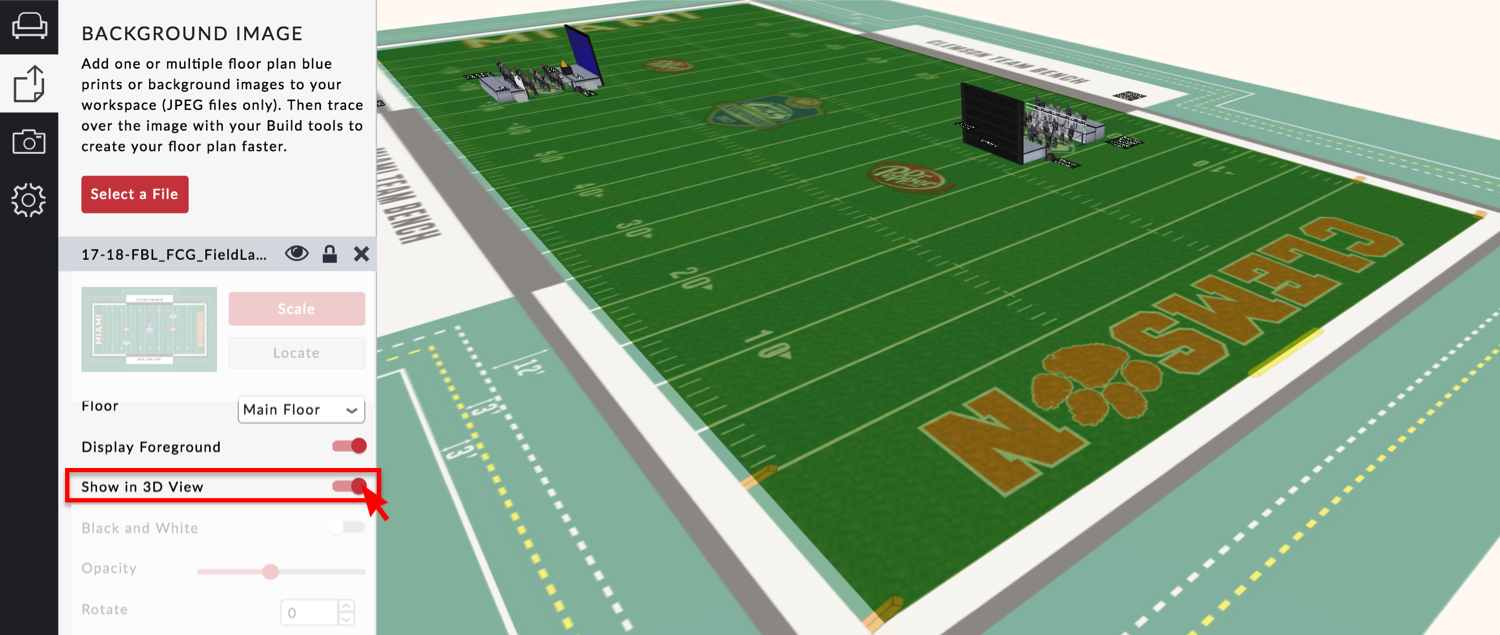
- Click on the "BACKGROUND IMAGE" tab
- Slide the “Show in 3D View” button to the right
- Click on the
-
Change the Background Image Opacity
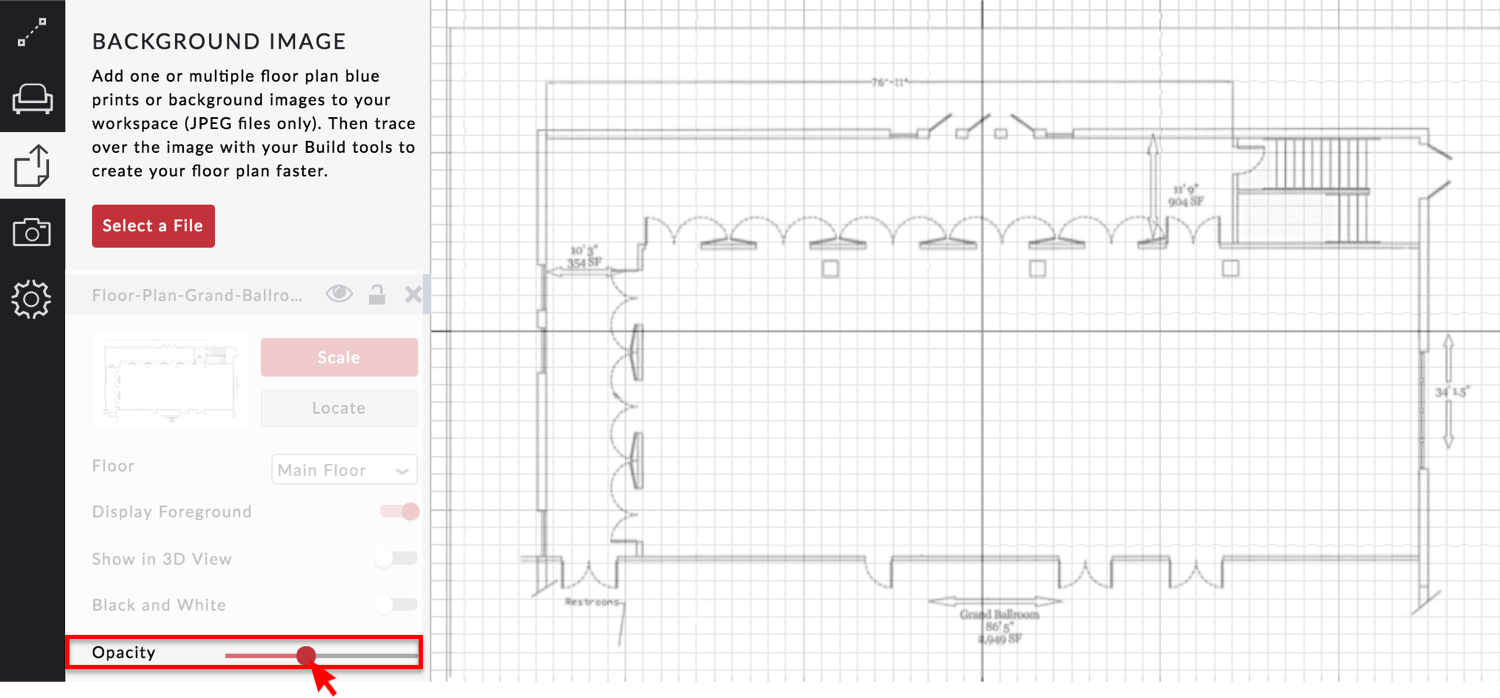
- Click on the "BACKGROUND IMAGE" tab
- Slide the “Opacity” button to the right
- Click on the
-
Edit a Wall: Wall Properties
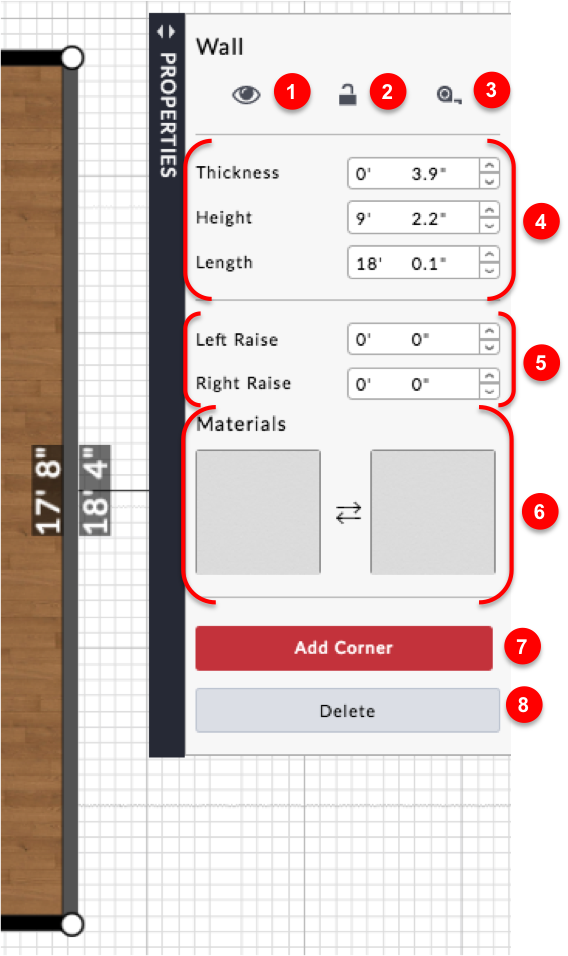
- : Hide the Wall in the workspace
- : Lock the Wall in place so it can not move in the workspace
 : Display the dimension of the wall
- Thickness / Height / Length: Change the dimensions of the wall
- Left Raise / Right Raise: Raise the end of the wall to the desired height to achieve a slanted Wall
- Materials: Change the material or color (for example: brick, plaster, wall paper, etc.) of each side of the Wall
- Add Corner: Split the Wall to enable a new corner to be added
- Delete: Remove or deletes the Wall from the workspace
-
Split a Wall in Half to Add a Corner
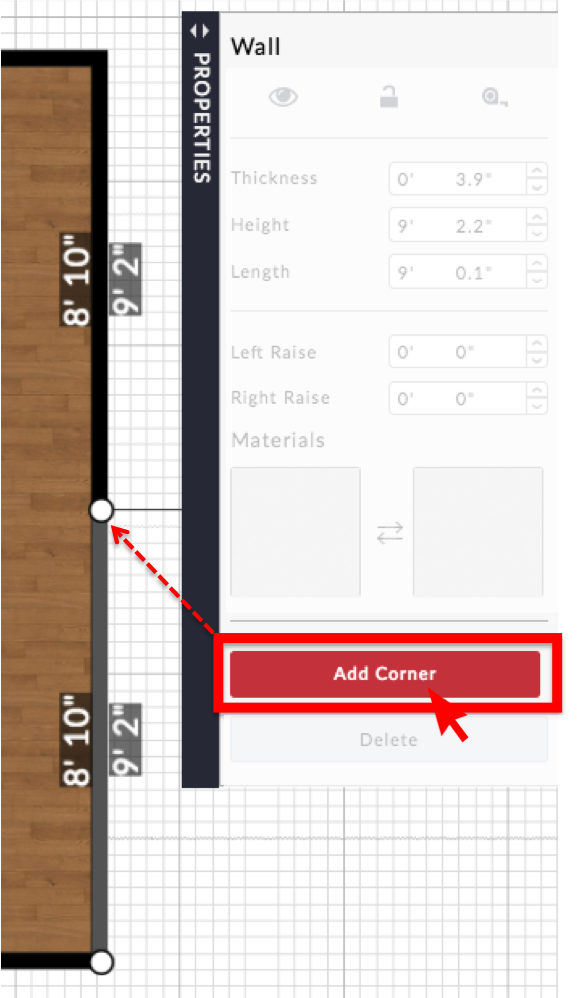
- Click the "Add Corner" button, which will split the wall into two (2) walls
- To make the two (2) newly created walls into a corner, click on the circle wall handle located in the middle of the two (2) new walls and drag to the desired corner/angle location
-
Edit a Room: Overview
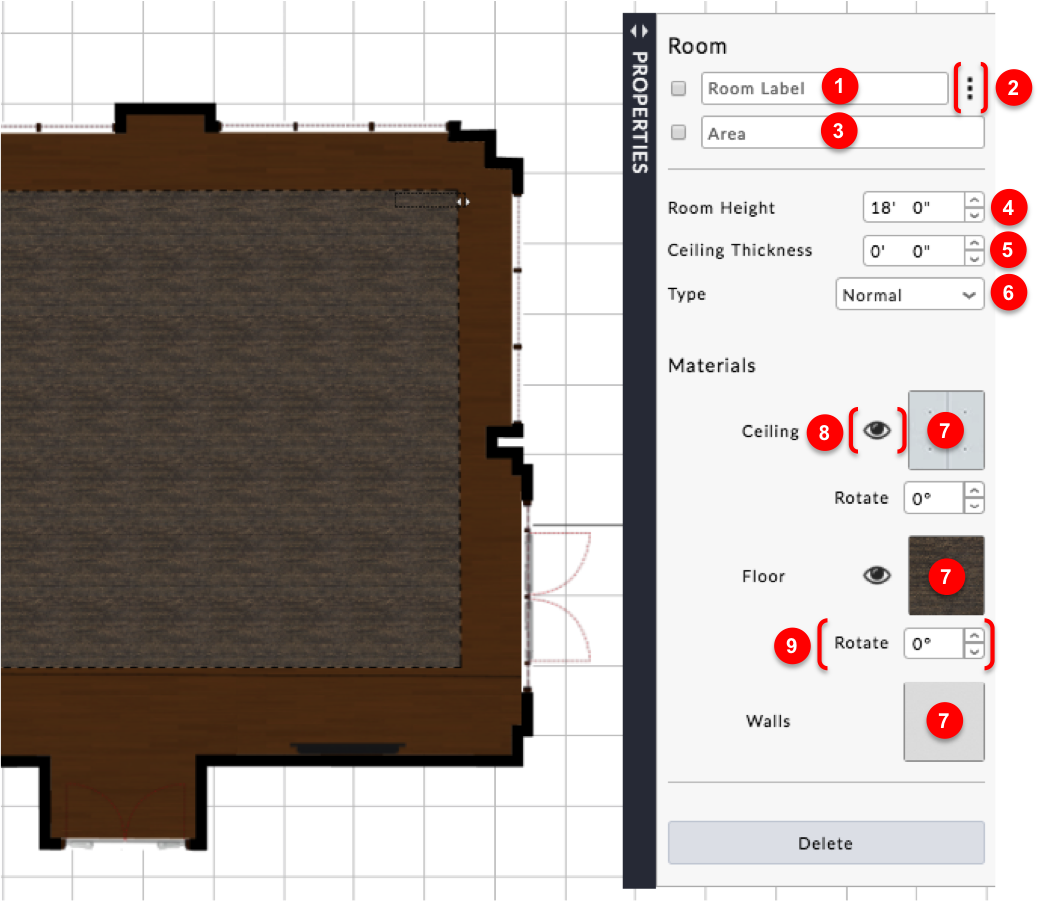
- Room Name: Name a room (for example: Ballroom)
- Room Label Sytle: Edit the size, color, bold. Italics, and more of the Room Label that is displayed on the floor plan
- Area: Give a subtitle to the room (for example: 75 sq.ft.)
- Height: Change the ceiling height of the room
- Ceiling Thickness: Change the thickness of the ceiling
- Type: Change the type of room (for example: normal, technical, solid or empty)
- Materials: Edit the material (for example: plaster, brick, stone, etc.) or color of the Ceiling, Floor, and Walls
- : Show/Hide the Floor or Ceiling
- Rotate: Rotate the direction of the selected material (for example: change the direction of a wood material from horizontal to vertical)
-
Edit the Room Label
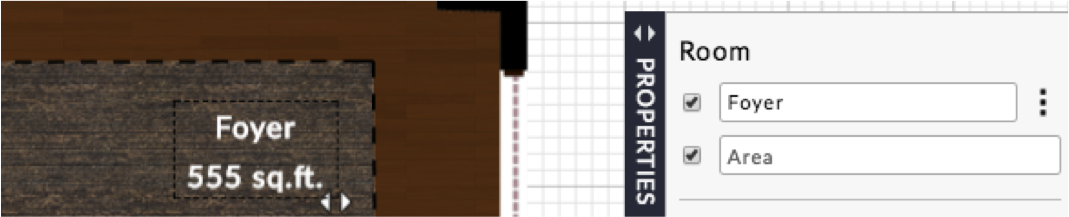
- Room Label: Give the room a name (for example: Salon)
- Area: Auto populates with the square footage or can be used as a description field
-
Define the Type of Room
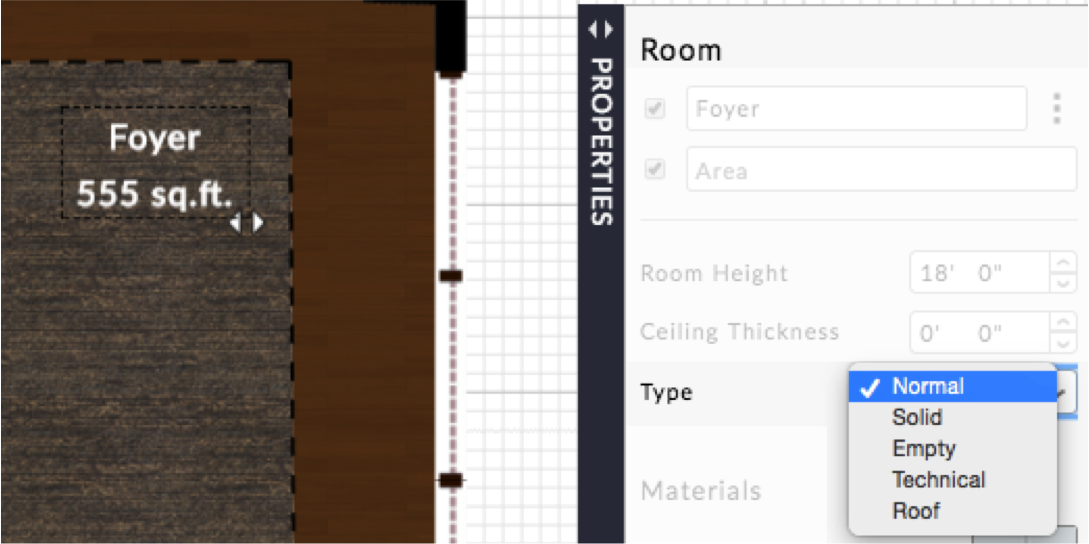
- Normal: Used for a standard room
- Solid: Blacks out the room in the 2D View (for non-use spaces)
- Empty: Hides the floor in the 2D view
- Technical: Greys out the floor in the 2D view (for elevators, electrical rooms, etc.)
- Roof: Used for a roof
-
Change the Ceiling, Floor & Wall Material & Color
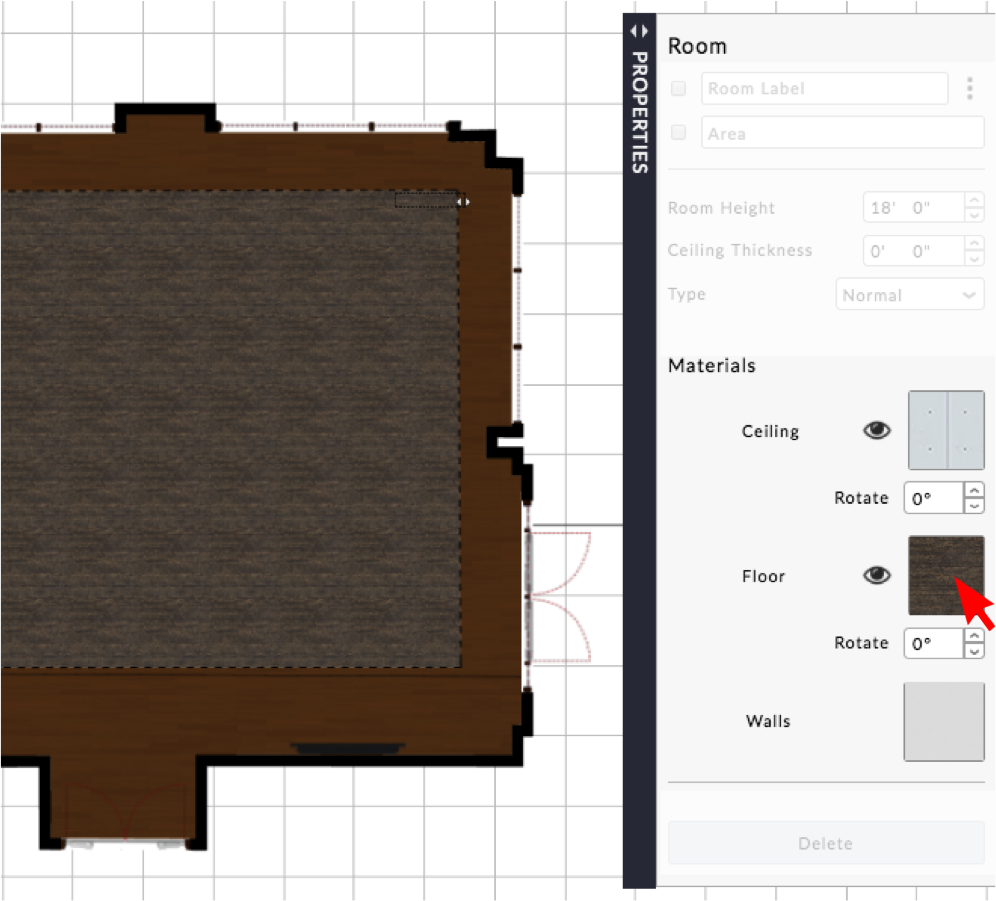
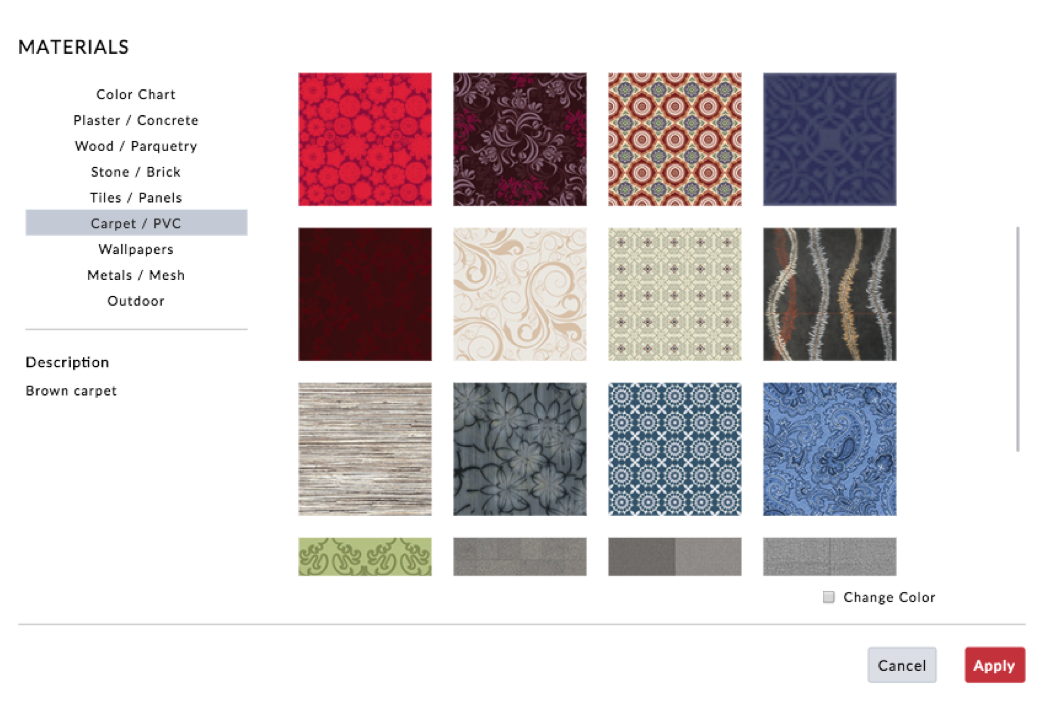
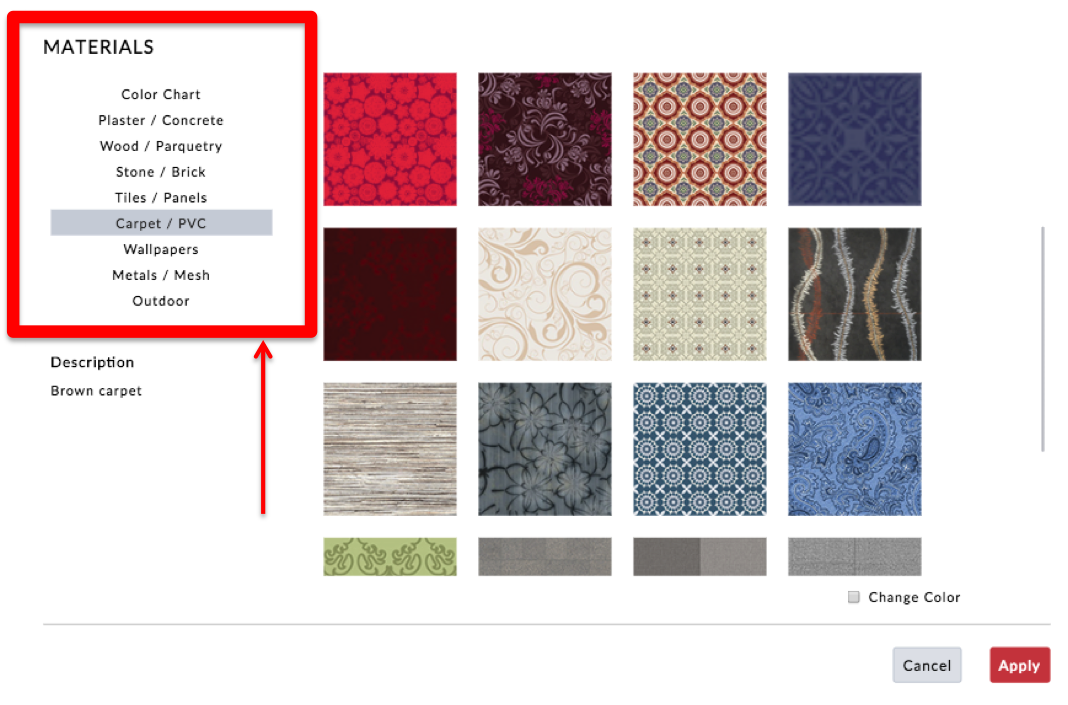
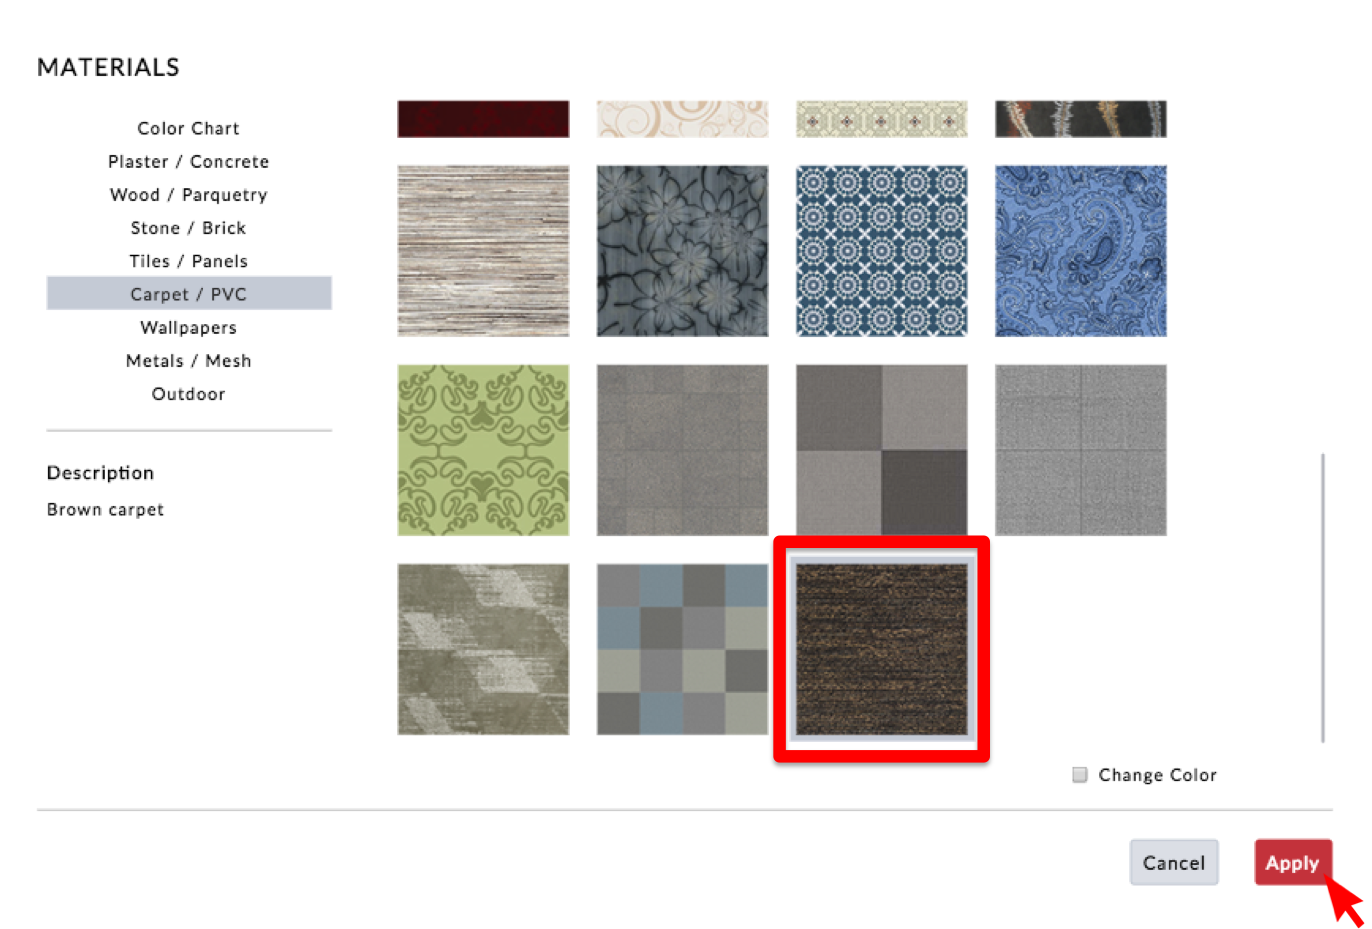
- Click on the thumbnail icon for the “Ceiling”, “Floor” or “Walls”
- The “Materials” window will open
- Select one of the categories (e.g., Color Chart, Plaster / Concrete, Carpet / PVC, etc.) and view the material options
- Click on a thumbnail material and click the “Apply” button
-
Add Two (2) Different Materials to a Wall
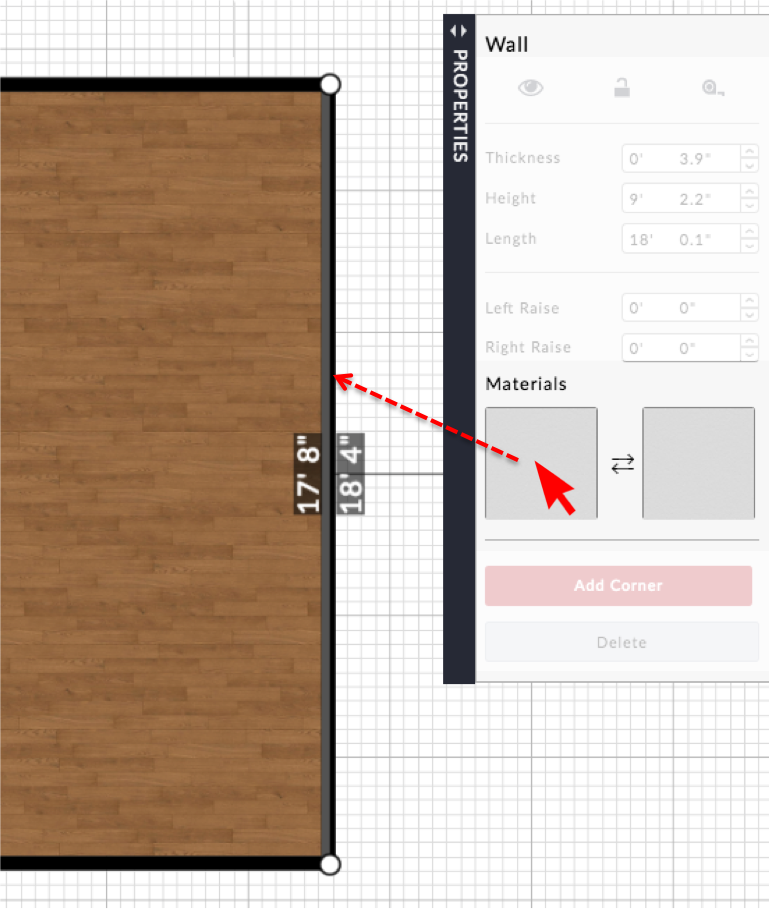
- While in the "2D Plan" view, click on the wall that needs the color or material changed
- Click on the left or right Material thumbnail icon to change the appropriate side of the wall (when you hover over the thumbnail image, it will highlight on your floor plan in a grey color the side of the wall you are changing)
- The Materials Window will open where you can select the desired Material or color
- Click the “Apply” button to apply the new Material or color to the side of the wall
- Repeat steps 1-4 to change the color or material of the other side of the wall
-
Add a Door or Opening
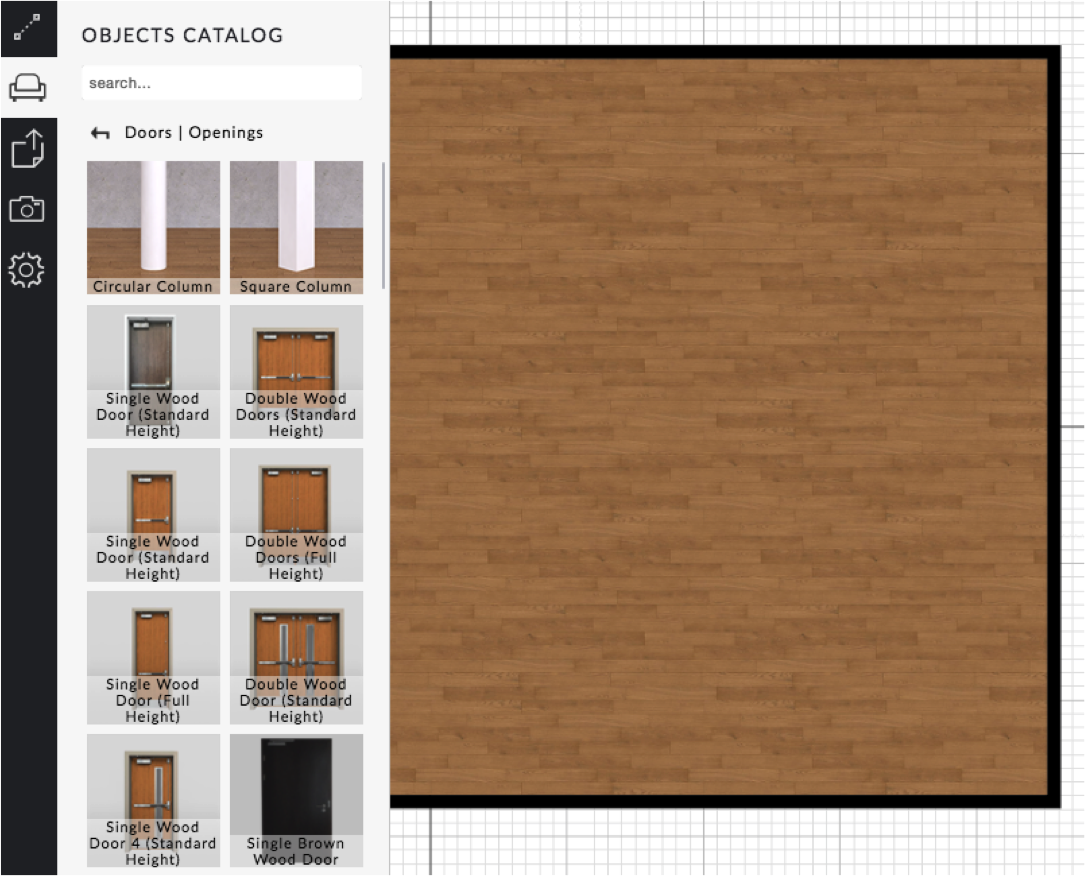
- While in the "2D Plan" view, click on the "FURNISH" tab
- Scroll to find the “Room Construction” -> “Doors | Openings” category and click on it
- Scroll to see your options or search for an item by typing a keyword into the Search Bar
- Click on the desired opening (for example: door, window, etc.) and drag the item into the floor plan (the opening will automatically snap into the wall)
- While in the "2D Plan" view, click on the
-
Change the Color of a Door or Opening
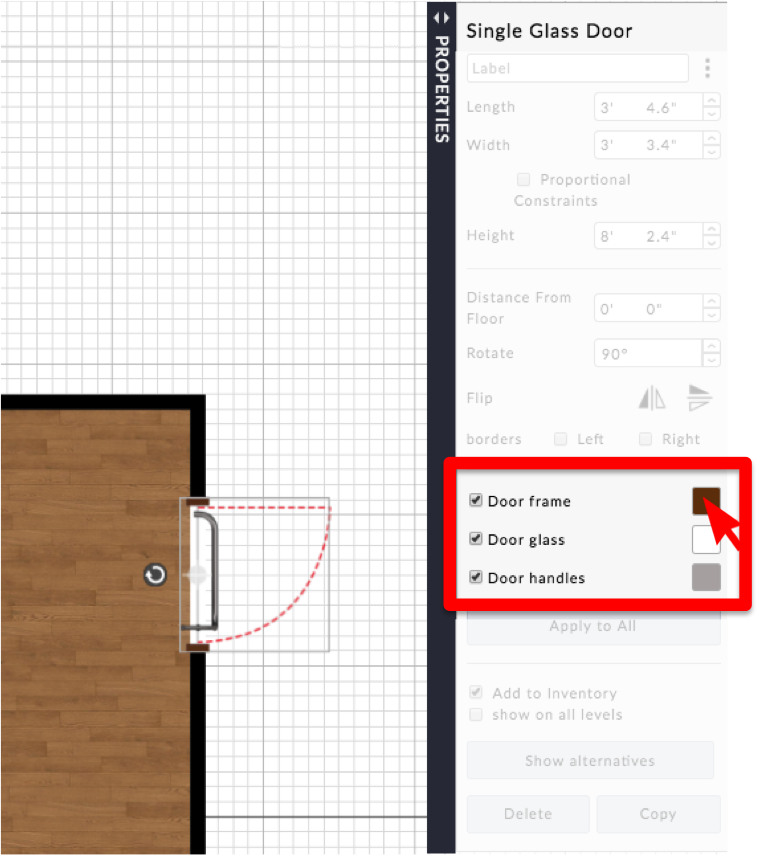
- While in the "2D Plan" view or the "3D Global" view, click on the opening (for example: door) in the floor plan
- The Item Properties window will appear on the right
- Click on the color box for the part of the item that needs the color change
- Select a color from the color pallet or input a Hex Code
- To apply the color to all of the same Items (for example: double doors) in the floor plan, click the “Apply to All” button
-
Change the Direction of a Door or Opening
- While in the "2D Plan" view or the "3D Global" view, click on the opening (for example: door)
- The Item Properties window will appear on the right
- Click one of the two flip icons (Vertical
 or Horizontal
 ) to change the opening side (for example: to change a door from opening inwards to outwards or to change a door handle from being on the left to being on the right)
-
Change the Dimensions of a Door or Opening
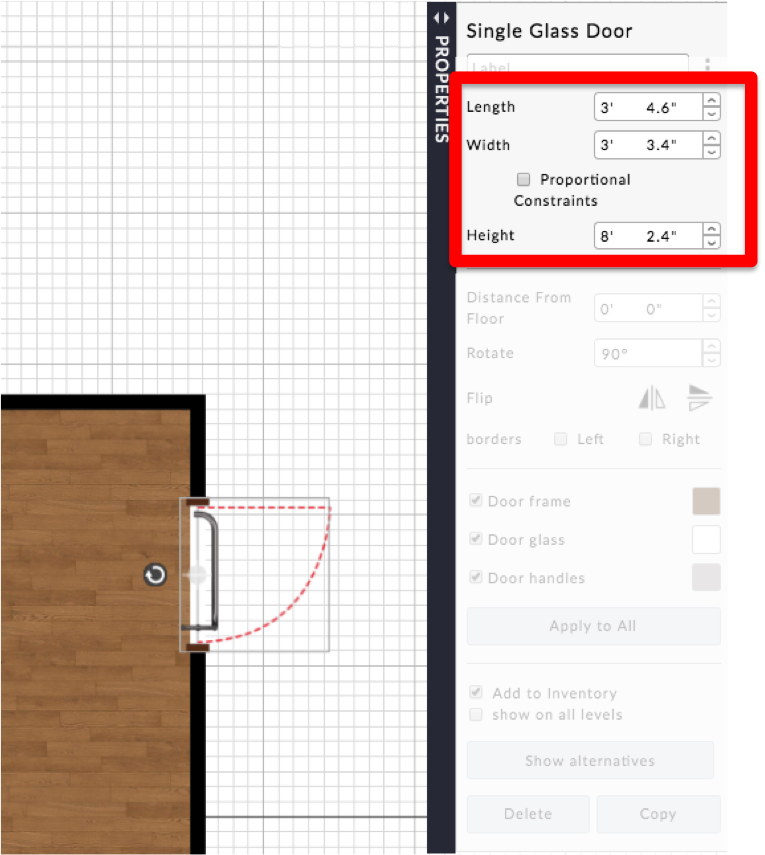
- While in the "2D Plan" view or the "3D Global" view, click on the opening (for example: door)
- The Item Properties window will appear on the right
- Enter the desired Length, Width and Height dimensions in the respective fields (check the “Proportional Constraints” button prior to inputting dimensions to keep the new dimension proportionate)
-
Advanced Tools
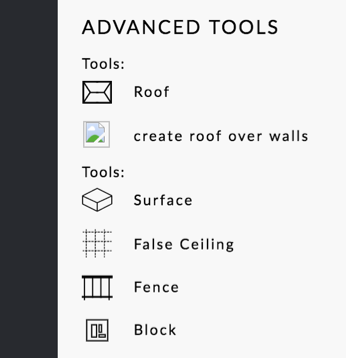
- Roof: Add a roof
- Create Roof Over Walls: Place a roof on top of walls (must add a Floor above the current floor to use this feature)
- Surface: Adds a raised surfaced with custom colors and materials (for example: a step)
- False Ceiling: Adds a ceiling within a ceiling (for example: recessed sections of a ceiling that need a different color or texture)
- Fence: Adds a customizable fence
- Block: Adds a block to the floor plan
-
Add a Roof
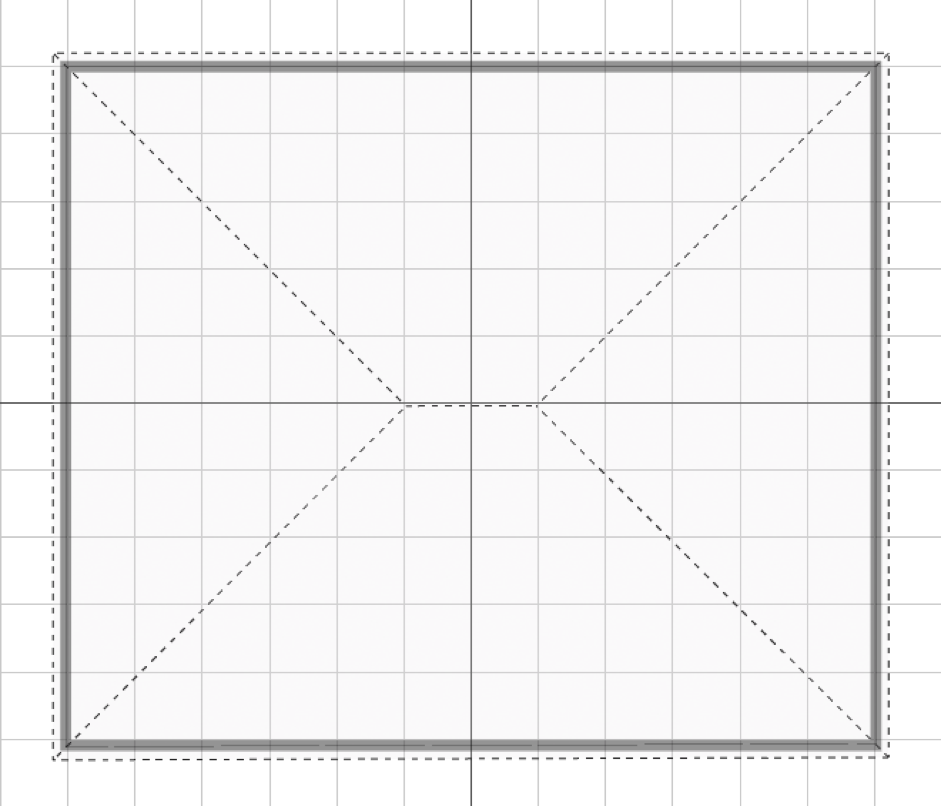
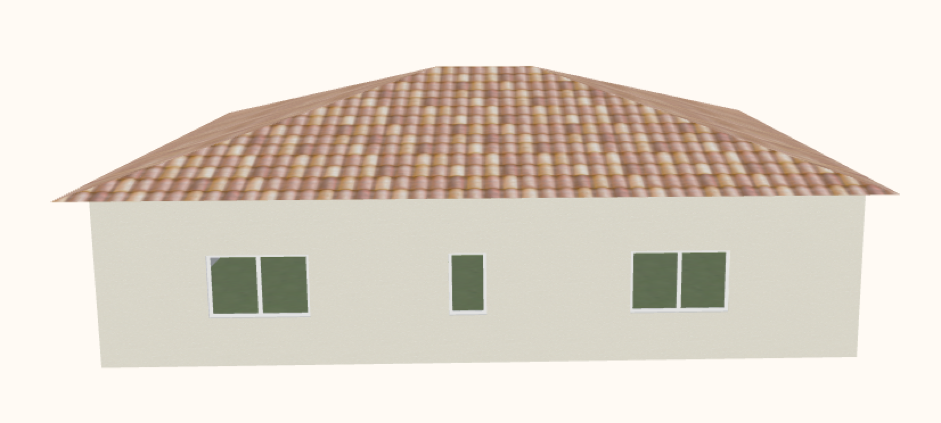
- While in the "2D Plan" view, click on the "BUILD" tab
- Click on the "Roof" drawing tool
- Left click your mouse (on a tablet tap your finger) where each corner of the roof will be
- The roof will snap together once you click all corners of the roof and end by clicking on the starting point
- Click on the roof to open the Roof Properties window to make adjustments such as the distance from the floor, the color and texture, etc.
- While in the "2D Plan" view, click on the
-
Edit a Roof
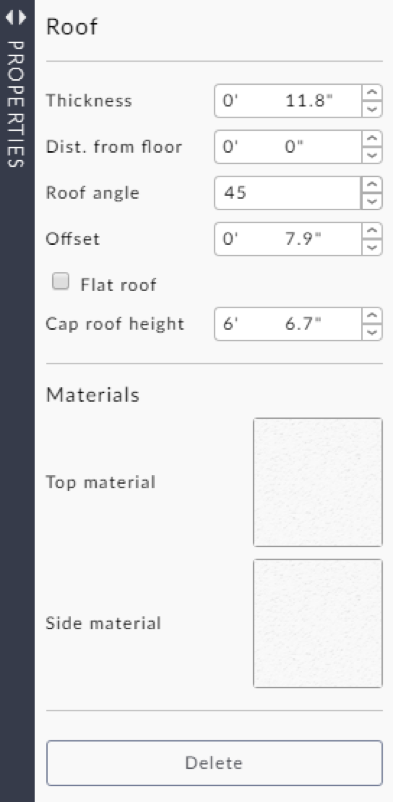
- Thickness: Defines the roof material’s thickness
- Distance from Floor: Raises the roof off the ground
- Roof Angle: Alters the angle of the roof
- Offset: The overhang distance of the roof
- Cap Roof: Eliminates the point on the roof to make the top of the roof a flat surface
- Materials: Changes the material or color (e.g., brick, plaster, etc.) of the top and side of the roof
-
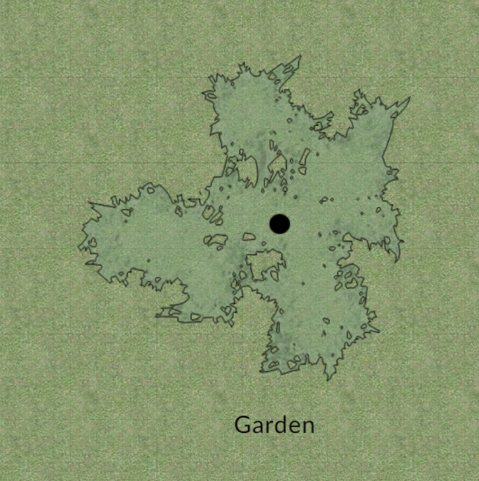
Draw an Outdoor Space
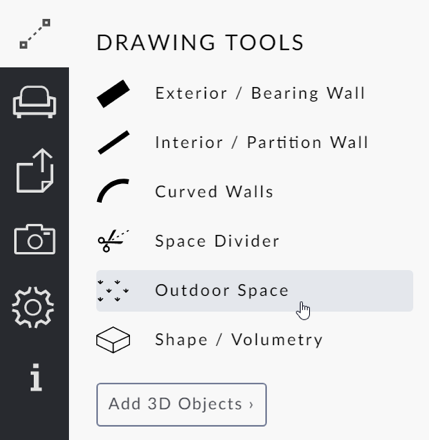
- Click on the "BUILD" tab
- Click on the "Outdoor Spaces" drawing tool
- Left click your mouse (on a tablet tap your finger) where each corner of the outdoor space will be
- The outdoor space will snap together and the floor will appear once you click all corners of the space and end by clicking on the starting point
* To exit out of the wall drawing mode: Press the "Escape" key on your keyboard or double click your mouse (on a tablet double tap your finger)
- Click on the
-
Create a Terrace with a Ceiling
- Click on the "BUILD" tab
- Click on the "Outdoor Spaces" drawing tool
- Left click your mouse (on a tablet tap your finger) where each corner of the outdoor space will be
- The outdoor space will snap together and the floor will appear once you click all corners of the space and end by clicking on the starting point
- Click in the center of the floor and the Outdoor Spaces Properties window will appear on the right
- Click the “eye icon” next to the “Ceiling” to unhide and show the ceiling
- Click on the
-
Add Trees & Bushes
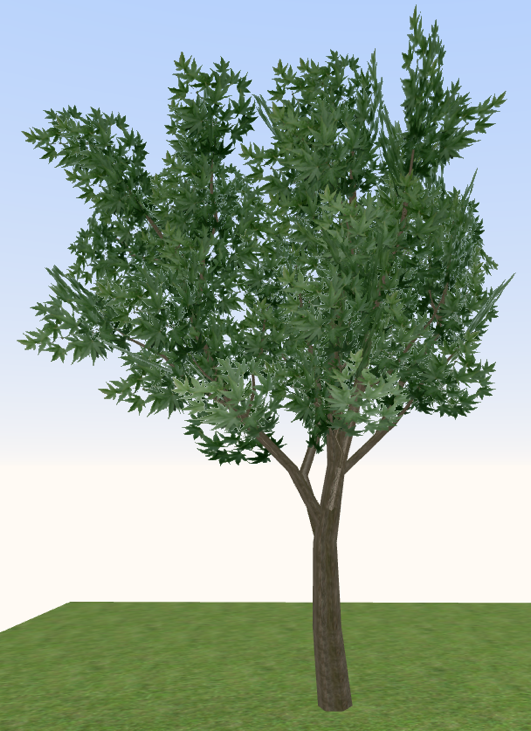
- While in the "2D Plan" view, click on the "FURNISH" tab
- Scroll to find the “Trees | Plants” category and click on it
- Scroll to see your options or search for an item by typing a keyword into the Search Bar
- Click on the desired tree or plant and drag the item into the floor plan (the opening will automatically snap into the wall)
- While in the "2D Plan" view, click on the
FURNISH A FLOOR PLAN:
-
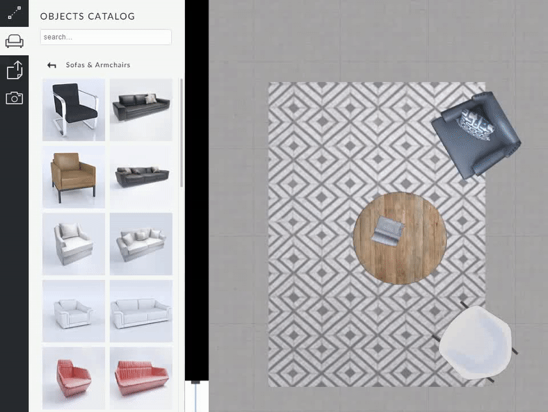
Place an Item in the Floor Plan
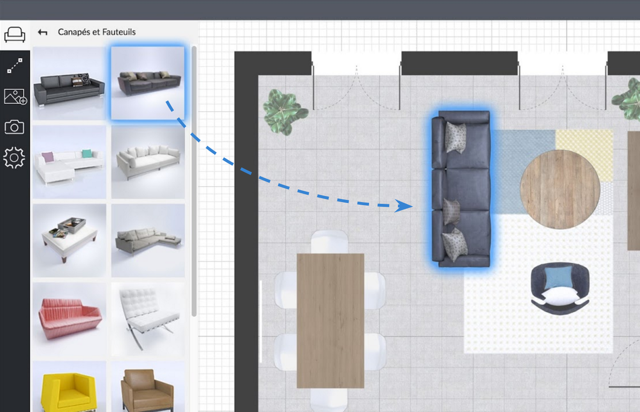
- While in the "2D Plan" view, click on the "FURNISH" tab
- Select a Category
- Scroll to see the options or search for an item by typing a keyword into the Search Bar
- Click with the mouse (on a tablet hold with your finger) and drag the item into the workspace
- While in the "2D Plan" view, click on the
-
Move an Item in the Floor Plan in 2D
- While in the "2D Plan" view, click with the mouse (on a tablet hold with your finger) on the item that you have placed in your floor plan that you want to move
- While clicking/tapping on the item, drag and move the item to the desired location
-
Edit an Item’s Properties
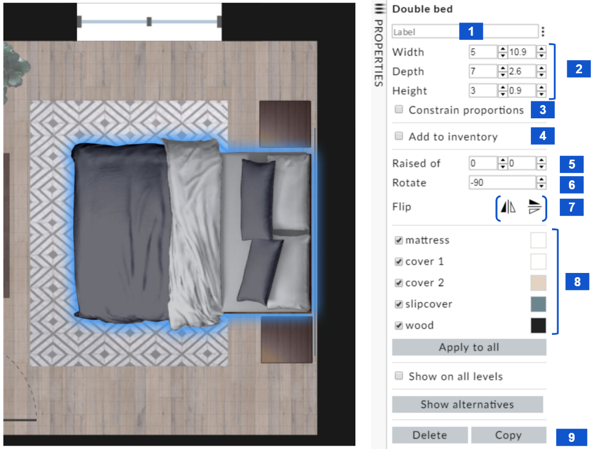
- Label: Name an item (for example : "Gift Table") or create a Seating Chart (for example, "Table 1")
- Width / Depth / Height: Edit the item dimensions
- Proportional Constraints: Keep the proportions when editing the item dimensions
- Distance from Floor: Raise the item off the ground
- Rotate: Rotate the item (clockwise or counter clockwise)
- Flip: Flip the item vertically or horizontally (for example : direction of the door opening)
- Colors: Change the item color(s)
- Apply to All: Change the color of all the same items in the floor plan at once
- Add to Inventory: Add the selected item to the project Inventory
- Show on All Levels: Show the selected item on all levels of the floor plan
- Show Alternatives: Swap out all of the same items (for example: Folding Chair) with a new item (e.g.: Conference Chair)
- Delete: Remove the item from the floor plan
- Copy: Make a duplicate of the item in the floor plan
-
Add a Label
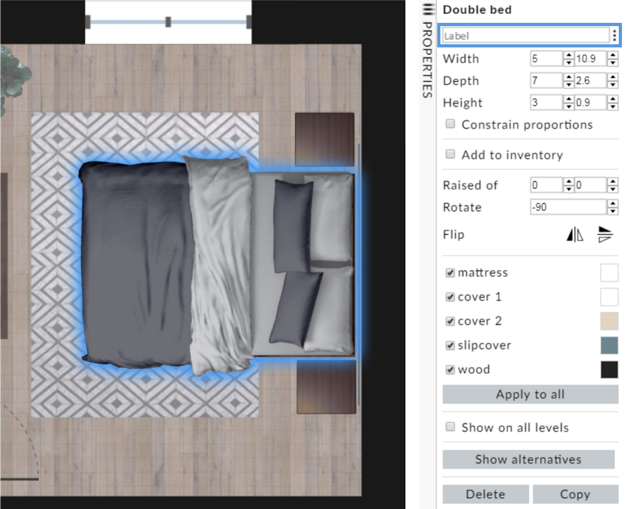
- Click on an item in the floor plan in either the "2D Plan" view or the "3D Global" view
- The item’s Properties window will appear on the right
- In the “Label” field, name an item (for example: "Gift Table")
-
Create a Seating Chart
- Click on an item in the floor plan in either the "2D Plan" view or the "3D Global" view
- The item’s Properties window will appear on the right
- In the “Label” field, type in the number (for example: "Table 1") or name (for example : "Florence")
- Click on the Seating Chart icon (3 dots located to the right of the Label field)
- Input all the guests' names that are sitting at the table, along with their entrée selections
* Tip: Seating Charts will auto-populate in the “Inventory” section (see page __) and this is where you will be able to Print or Email the Seating Chart
-
Edit an Item’s Dimensions
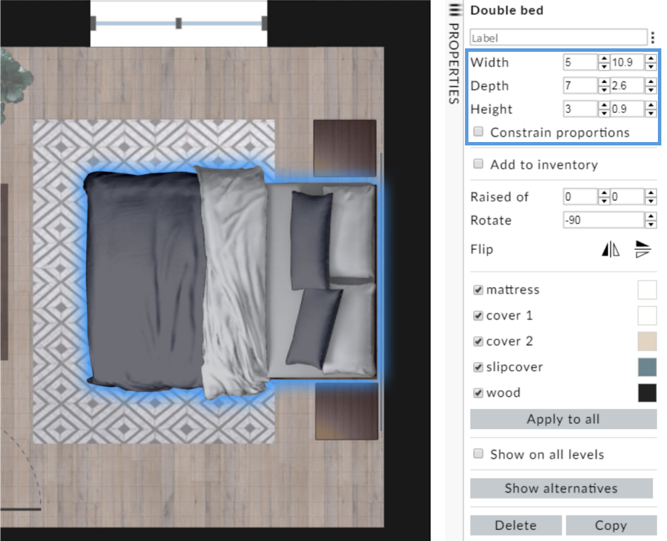
- Click on an item in the floor plan in either the "2D Plan" view or the "3D Global" view
- The item’s Properties window will appear on the right
- In the "Width", "Depth", or "Height" fields, enter the desired dimensions
- To keep the proportions of an item (for example: for a door), check the “Proportional Constraints” box prior to changing the Width or Depth
-
Raise an Item Off the Floor
- Click on an item in the floor plan in either the "2D Plan" view or the "3D Global" view
- The item’s Properties window will appear on the right
- In the “Distance from Floor” field, input the dimension to raise the item off the ground (for example: use this for a plate to position the plate on top of a table)
-
Rotate an Item
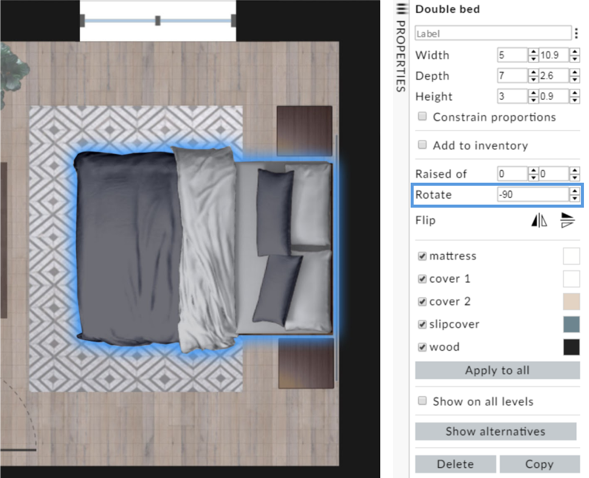
- Click on an item in the floor plan in either the "2D Plan" view or the "3D Global" view
- The item’s Properties window will appear on the right
- In the “Rotate” field, input the desired rotation degree (for example: 90 to rotate the item a quarter of a turn); or
- While in the "2D Plan" view, click on the item in the floor plan and you will see a rotate icon
 on the item
 - Click on the rotate icon and drag it either clockwise or counterclockwise to rotate the item
-
Flip an Item
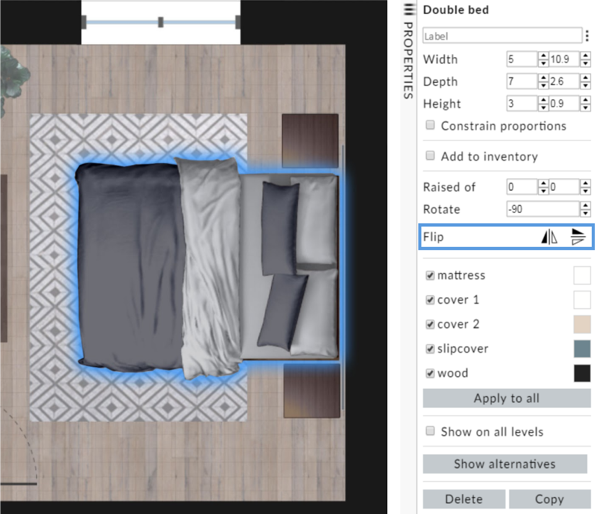
- Click on an item in the floor plan in either the "2D Plan" view or the "3D Global" view
- The item’s Properties window will appear on the right
- Click either the Vertical icon to flip the item vertically or the Horizontal
icon to flip the item horizontally (for example: click on a door in the floor plan and click the horizontal icon to have the door open in the opposite direction)
-
Change the Color of an Item
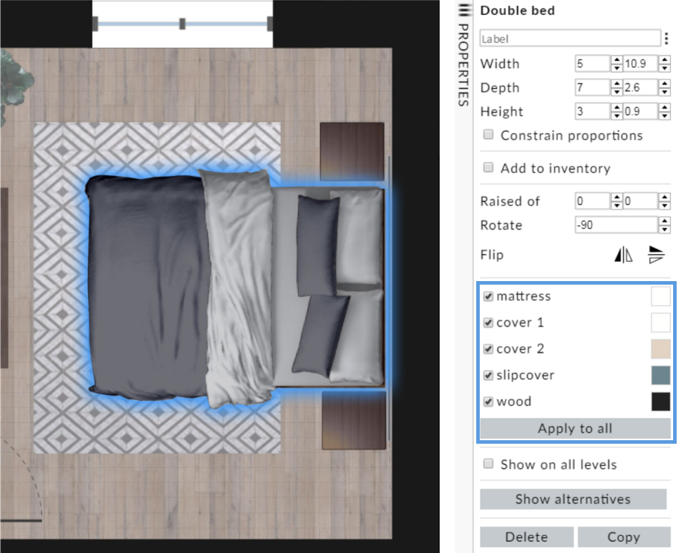
- Click on an item in the floor plan in either the "2D Plan" view or the "3D Global" view
- The item’s Properties window will appear on the right
- Click on the color icon of the item part (for example: cushion) to change the color
- Select a color from the color pallet or input a Hex Code
- To apply the color to all of the same Items in the workspace, click the “Apply to All” button
-
Add an Item to the Inventory
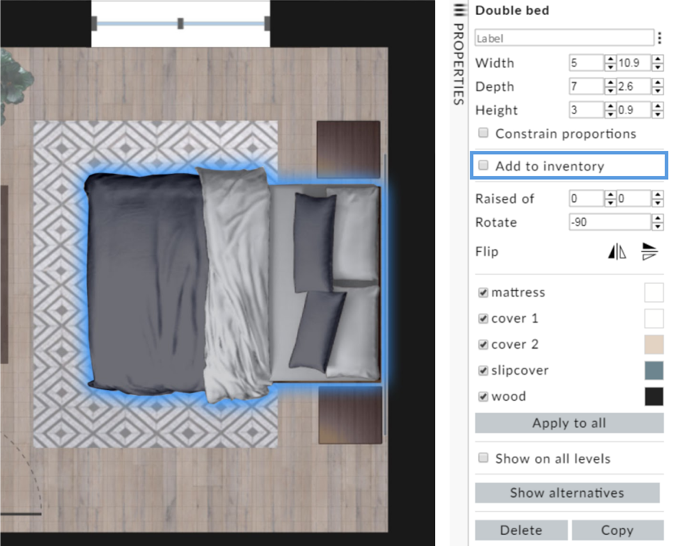
- Click on an item in the floor plan in either the "2D Plan" view or the "3D Global" view
- The item’s Properties window will appear on the right
- Check the "Add to Inventory" box to add the item to the "Inventory" list (see page __)
* Tip: Most items with the exception of "Room Construction" and "Trees and Plants" default to the box being checked and the item being added to the Inventory
-
Show an Item on All Levels
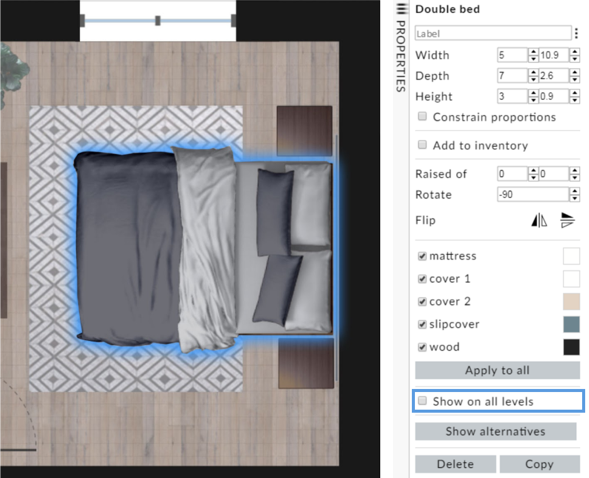
- Click on an item in the floor plan in either the "2D Plan" view or the "3D Global" view
- The item’s Properties window will appear on the right
- Check the "Show on All Levels" box to have the item appear on all Levels within the project
-
Alternatives: Replace an Item in a Floor Plan with a New Item
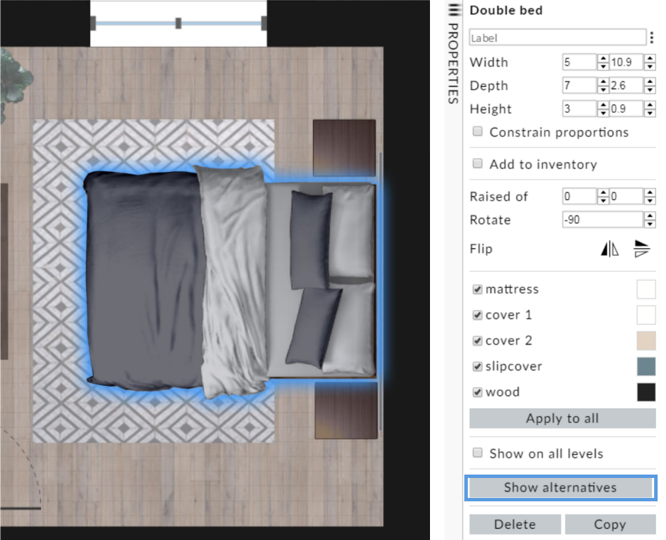
- Click on an item in the floor plan in either the "2D Plan" view or the "3D Global" view
- The item’s Properties window will appear on the right
- Click on the "Show Alternatives" button
- The Alternatives window will appear in the middle of the screen
- Scroll through to view the alternative items and click on the image of the new replacement item
- Click "Apply" to swap out the one item or "Apply to All" to replace all of the same items (multiple items) in the floor plan with the new item
-
Delete an Item in the Floor Plan
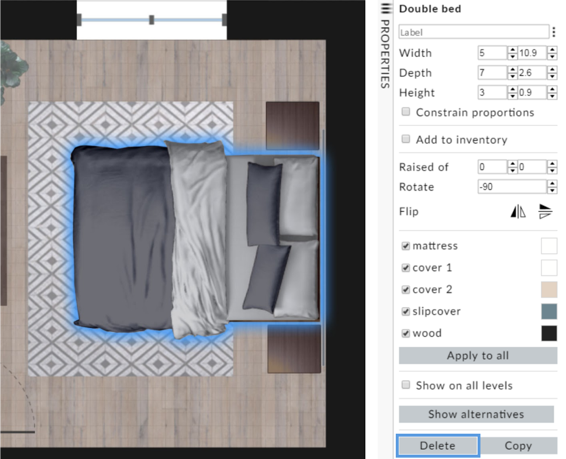
- Click on an item in the floor plan in either the "2D Plan" view or the "3D Global" view
- The item’s Properties window will appear on the right
- Click on the "Delete" button to remove the item from the floor plan
-
Copy or Duplicate an Item in the Floor Plan
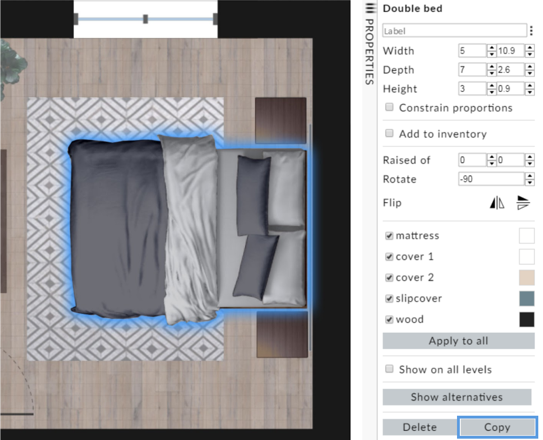
- Click on an item in the floor plan in either the "2D Plan" view or the "3D Global" view
- The item’s Properties window will appear on the right
- Click on the "Copy" button to make a copy or duplicate the item in the floor plan
-
Edit an Item in the Floor Plan in 3D
- While in the "3D Global" view, click with the mouse (on a tablet hold with your finger) on the item that you have placed in your floor plan that you want to move
- While clicking/tapping on the item, drag and move the item to the desired location
-
View an Item in the Floor Plan in 3D
- Click on the "3D Walk" button to view the item in 3D from eye level point of view
- Click on the "3D Global" button to view the item in 3D from an aerial point of view
-
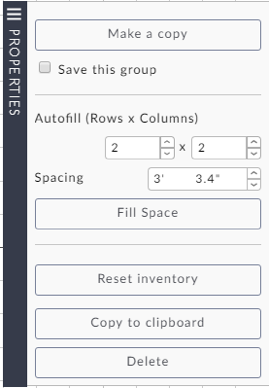
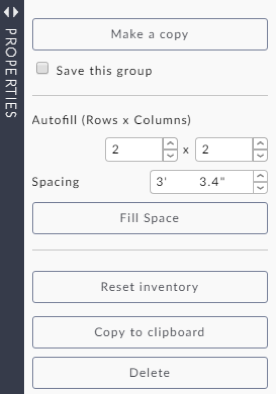
Select Multiple Items to Edit
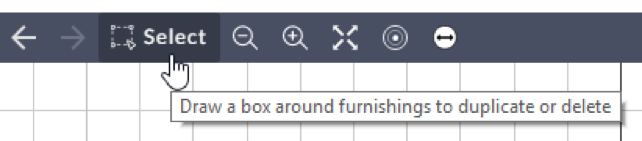
- Select: Draw a box around a group of items (can also be used for a single item) to enable saving as a group, duplicating, deleting or autofilling a floor plan
- Make a Copy: Creates a single copy of the selected item(s)
- Save This Group: Locks multiple items together as a single item
- Autofill (Rows x Columns) and Spacing: Fills a space with the selected item(s) with the specified number of rows and columns and spacing between each copy
- Reset Inventory: Rests the Inventory Document to the default items
- Copy to Clipboard: Copies the selected item(s) to your computer’s memory to enable pasting on a different level or in a different floor plan
- Delete: Deletes the selected group of items
-
Rotate Multiple Items at Once
- While in the "2D Plan" view, click the “Select” tool in the black navigation bar and draw a box around all the items that need to be rotated
- While the items are still highlighted, click on the rotate icon and drag to the desired rotation
-
Copy or Delete Multiple Items

- While in the "2D Plan" view, click the “Select” tool in the black naviagtion bar and draw a box around all the items that need to be copied or deleted
- The properties window will appear on the right
- Click "Copy" to make a duplicate of the group of items or "Delete" to remove the group of items
-
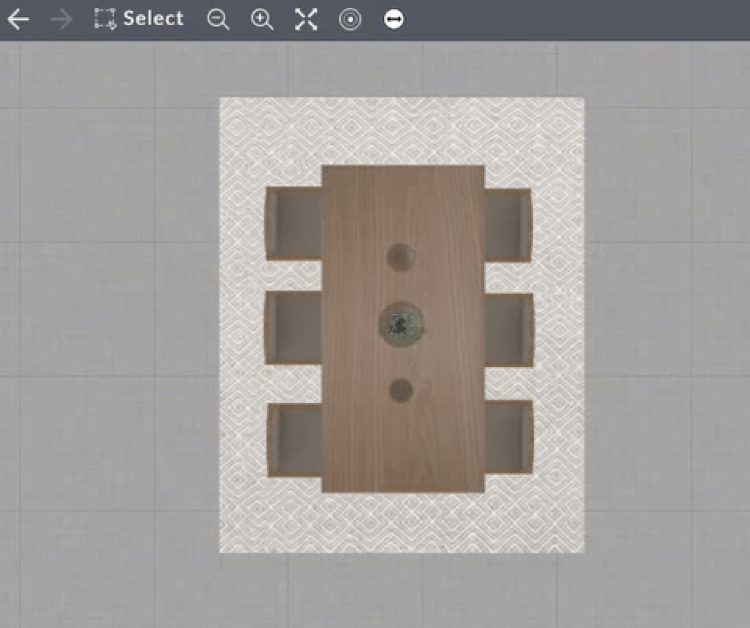
Autofill a Foor Plan with Item(s)
- While in the "2D Plan" view, click the “Select” tool in the black navigation bar and draw a box around all the items (can also be used for a single item such as a chair for creating a row of chairs)
- Input the number of rows and the number of columns needed, as well as the desired spacing
- Click the “Fill Space” button
*Tip: If the column spacing needs to be different than the row spacing, perform steps 1-3 two times - first by making the columns copies and then secondly by making the row copies)
-
Copy a Group of Items to a Different Floor Plan or Level
- While in the "2D Plan" view, click the “Select” tool in the black navigation bar and draw a box around all the items that need to be copied to a different floor plan (for example: for a table setup draw a box around all the chairs and the table)
- Click the “Copy to Clipboard” button
- Go to a new level or open a different floor plan and paste the grouping of items by using the keyboard shortcut for paste (for a Mac: “Command + V” and for a PC: “CTRL + V”)
*Tip: If the column spacing needs to be different than the row spacing, perform steps 1-3 two times - first by making the columns copies and then secondly by making the row copies)
FLOORS & VERSIONS:
-
Floors
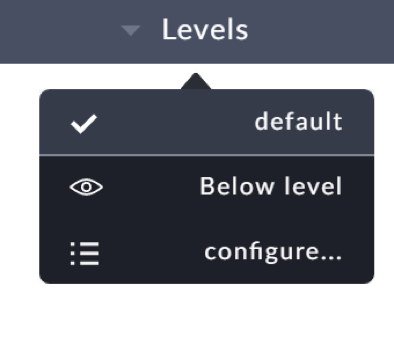
- Click on “Floors” tab in the black navigation bar to show the Floors menu
- The floor checked is the active floor level
- Click on another floor name to switch to the desired level
- Check/uncheck “Below Level” to hide the below walls prints
- Click on “Configure” to create, delete, edit, and organize the Floors
-
Create a New Floor

- Click on “Floors” tab in the black naviagtion bar to show the Floors menu
- Click on “Configure” to create, delete, edit, and organize floors
- Click “Add Floor” to add a new floor and name the new floor
-
Delete a Floor
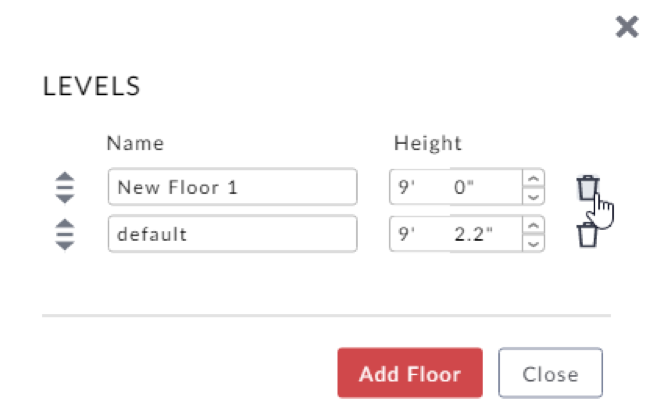

- Click on “Floors” tab in the black naviagtion bar to show the Floors menu
- Click on “Configure” to create, delete, edit, and organize floors
- Click on the “trash” icon located to the right of the floor that needs to be deleted
- Click “Yes” to confirm that you want to remove and delete the floor
-
Rename a Floor
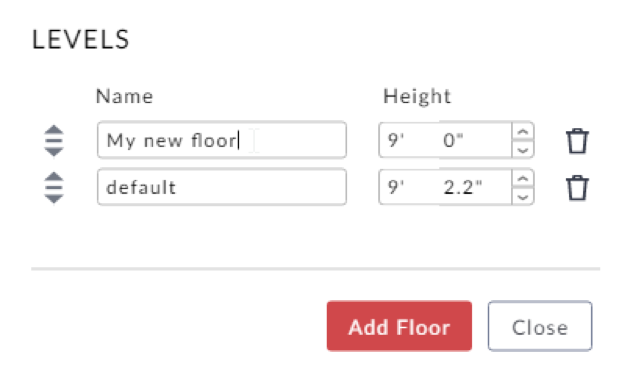
- Click on “Floors” tab in the black naviagtion bar to show the Floors menu
- Click on “Configure” to create, delete, edit, and organize floors
- Click into the text field of the floor you desire to rename and type the name
-
View Multiple Floors at Once
- After adding and creating all of the floors, click on the “3D Global” view located in the upper right corner
-
Create Several Versions of a Floor Plan
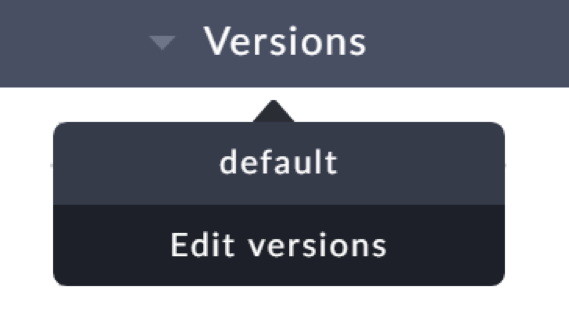
- Click on “Versions” in the black naviagtion bar to show the Versions menu
- Click “Modify Versions” to add a second version of the floor plan
- To copy the entire floor plan from the original version to the new version, go to the original version and use the “Select” tool (located in the black navigation bar) to draw a box around the entire floor plan
- Click the “Copy to Clipboard” button
- Go to the new version and use the keyboard shortcut for “paste” (for a Mac: “Command + C” and for a PC: “CTRL + C”) to paste the entire floor plan and begin making edits
ANNOTATE A FLOOR PLAN:
-
Draw a Line on the Floor Plan
- While in the "2D Plan" view, click on the "BUILD" tab
- Click on the "Line" annotation tool
- Click two (2) points on the floor plan (the starting point and the ending point)
- To edit the color or the type of line (solid or dashed), click on the line in the floor plan and the Line Properties Window will open to the right
- While in the "2D Plan" view, click on the
-
Draw a Rectangle or Square on the Floor Plan
- While in the "2D Plan" view, click on the "BUILD" tab
- Click on the "Rectangle" annotation tool
- Click two (2) points on the floor plan
- Click on the border to move it, or on the small square in the lower right corner to adjust the size
- Open the Property Window to change its color or delete the rectangle/square
* Tip: Use to mark setup areas for other Vendors
- While in the "2D Plan" view, click on the
-
Measure a Distance on the Floor Plan
- While in the "2D Plan" view, click on the "BUILD" tab
- Click on the "Measure" annot
- While in the "2D Plan" view, click on the